
Introduction
I have conducted numerous firewall review for various types of organisations over the years. A common theme observed during these reviews is that most organisations do not have a firewall hardening procedure and/or do not conduct a regular firewall review which covers user accounts, exposed administrative interfaces, patch management and review of firewall rules. This article provides a guide or references other articles for hardening Cisco ASA firewalls and addressing the most common vulnerabilities observed during these firewall reviews.
Access Control
Use Central AAA
Configuring your Cisco ASA to use central AAA (Authentication, Authorisation and Accounting) services ensures that an extra level of protection is in place for user access to the device. The use of a central AAA service allows organisations to easily and centrally manage user accounts. This simplifies account management processes, and ensures that users’ accounts can easily be disabled across all network devices once they leave the organisation.
We will discuss three common methods for AAA: TACACS+, RADIUS and LDAP.
TACACS+
To configure the Cisco ASA to use TACACS+ AAA, you can use the following steps:
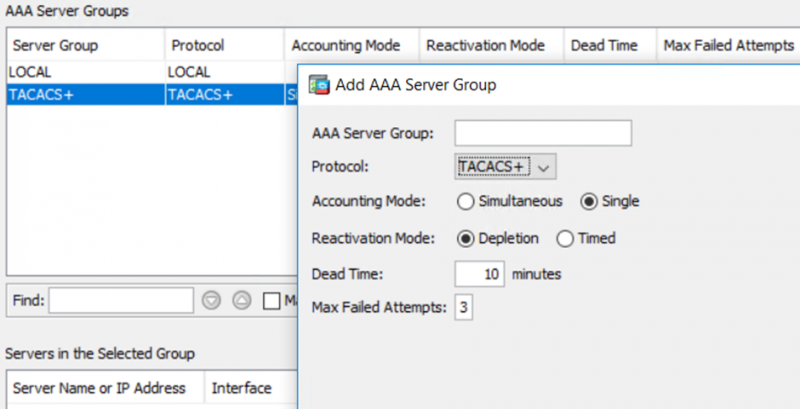
1) Create a new AAA server group:
This can be achieved using the following steps in ASDM:
Configuration -> Device Management -> Users/AAA -> AAA Server Groups. Click “Add“, and choose the TACACS+ protocol.
This can also be achieved using the following CLI command:
ciscoasa(config)# aaa-server TACACS+ protocol tacacs+
2) Configure the TACACS+ server:
you can use ASDM and add a server to the TACACS+ group previously created:
Configuration -> Device Management -> Users/AAA – AAA Server Groups. Choose the interface you wish users to be authenticated from, then add the TACACS+ server name or IP Address and the TACACS+ parameters, for instance the port number and server secret key.
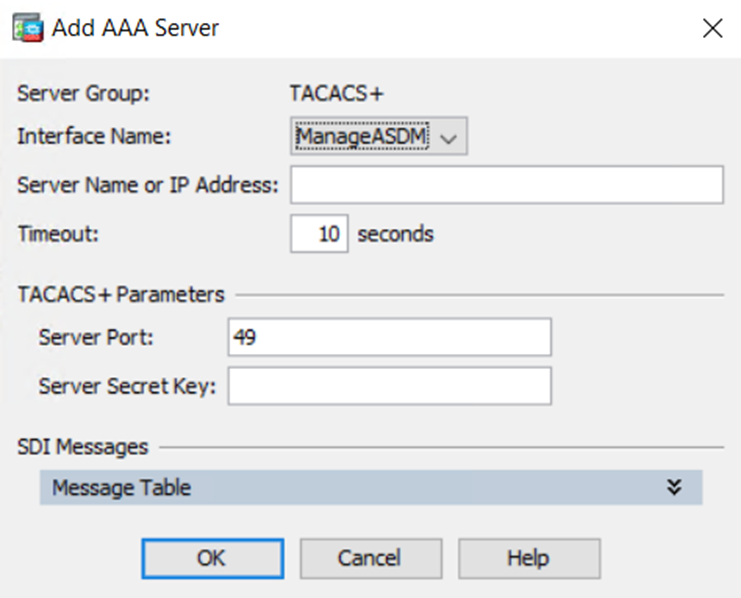
To verify that the parameters are correct, click the “Test” button within the Servers in the Selected Group area.
This can also be achieved using the following CLI commands:
ciscoasa(config)# aaa-server TACACS+ (inside) host 192.168.3.4

ciscoasa(config)# key **********
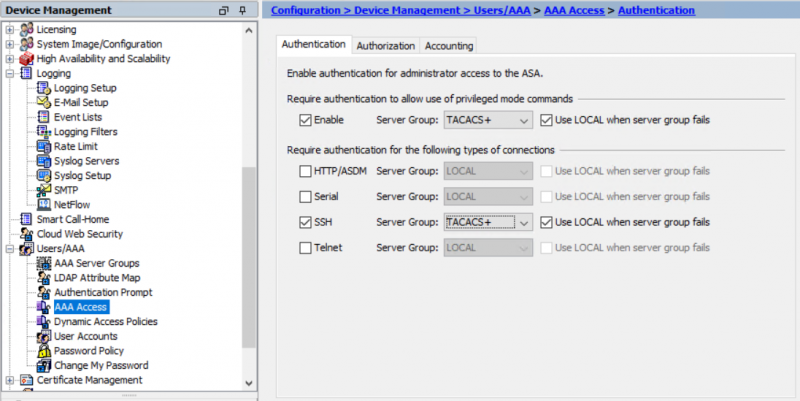
3) You can configure the Cisco ASA to use TACACS+ authentication using ASDM as follows:
Configuration -> Device Management -> Users/AAA -> AAA Access. In the “Authentication” tab, tick the checkbox for “Require authentication to allow use of privileged mode commands“. Select the server group previously created and optionally tick the “Use LOCAL when server group fails” checkbox to enable fall-back to the local database.
This can also be achieved using the following CLI command:
ciscoasa(config)# aaa authentication enable console TACACS+ LOCAL
Appending “LOCAL” allows the local database to be used as a fall-back method if the TACACS+ server group is unavailable.
4) You can configure the Cisco ASA to use TACACS+ for authorisation using ASDM as follows:
Configuration -> Device Management -> Users/AAA -> AAA Access. In the “Authorization” tab, tick the checkboxes for both “HTTP” and “Enable“. Note that the “Set ASDM Defined User Roles…” and “Configure Command Privileges…” buttons can be used to facilitate setting up privilege level restrictions.
This can also be achieved using the following CLI commands:
ciscoasa(config)# aaa authorization command TACACS+ LOCAL

ciscoasa(config)# aaa authorization http console TACACS+
Where TACACS+ is the server group previously created. Appending “LOCAL” allows the local database to be used as a fall-back method if the TACACS+ server group is unavailable.
5) You can configure the Cisco ASA to use TACACS+ for accounting using ASDM as follows:
Configuration -> Device Management -> Users/AAA -> AAA Access. In the “Accounting” tab, tick the checkbox for “Enable” under “Require accounting to allow accounting of user activity“, and select the previously created server group in the drop down menu.
This can also be achieved using the following CLI command:
ciscoasa(config)# aaa accounting enable console TACACS+
Where TACACS+ is the server group previously created. Note that accounting cannot be configured to use the local database as a fall-back method.
Please refer to the following URL for more information on how to configure TACACS+:
RADIUS
The way to configure RADIUS authentication in Cisco ASA is similar to TACACS+. The RADIUS protocol is specified instead of TACACS+ during configuration. Please refer to the following URL for more information:
LDAP
To configure LDAP for Cisco ASA devices, please refer to the following URL:
Please note that by default, plain text communication is used to communicate with the LDAP Server. If you do not configure SASL (e.g. Kerberos) to be used, it is recommended to secure the communications with SSL.
Enabling SSL for LDAP requests can be done using ASDM as follows:
Configuration -> Device Management -> Users/AAA -> AAA Server Groups. Click “Add” to add a new server, and select LDAP as the protocol. After configuring other parameters, ensure that the checkbox “Enable LDAP over SSL” is ticked.
This can also be achieved using the following CLI command in host configuration mode for the LDAP server instance:
ciscoasa(config-aaa-server-host)# ldap-over-ssl enable
Use Named Local Administrator Accounts
Using named administrator accounts ensures that every action can be traced back to the user who is responsible for making that action. Additionally, privilege levels can be assigned to individual users. In combination with user authorisation as detailed in the Access Control section, this allows fine-grained control over the operations that are are accessible to each user, ensuring that the principle of minimal privilege can be enforced.
To create an administrative account using the ASDM, perform the following steps:
Configuration -> Device Management -> Users/AAA -> User Accounts
1) Click “Add” to create a new user.
2) Within the identity window you can select the username, password and level of access required.
Note that privilege levels can range from 1 to 15, with 15 being the highest level of access possible.
To create an administrative account using the CLI use the following command:
ciscoasa(config)# username john_adm password ********** privilege 15
For more information on how to configure administrator accounts within Cisco ASA, please refer to the following URL:
Note that when enabling Central Authentication, the local account database can only be used as a fall-back authentication method in case the authentication server is unreachable.
Enforce Password Complexity
Enforcing password complexity rules that comply with the organisation’s password policy ensures that the accounts are protected using complex passwords, that are difficult to guess or brute force. Password complexity is often in place on Windows Active Directory, but overlooked on networking devices.
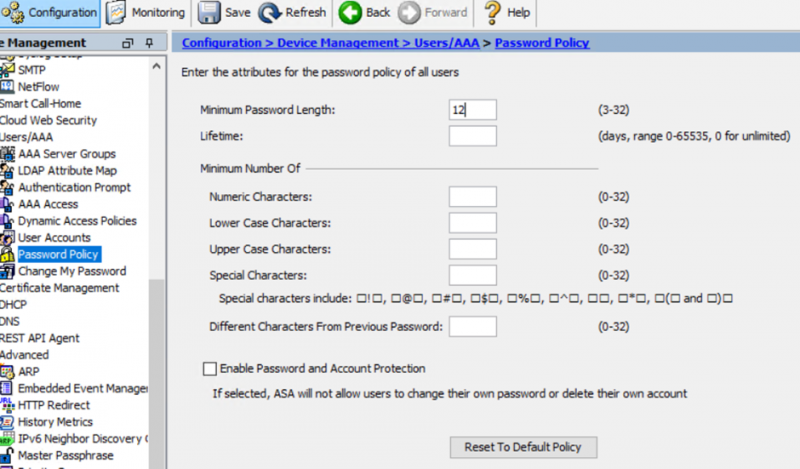
Password complexity can be configured using the following steps in ASDM:
Configuration -> Device Management -> Users/AAA -> Password Policy. Within the GUI you can set a number of options, which are listed below:
- Password length (3-32)
- Password expiration time (lifetime)
Minimum number of the following:
- Number Characters (0-32)
- Lower Case Characters (0-32)
- Upper Case Characters (0-32)
- Special Characters (0-32)
It is also possible to set the number of characters from the previous password that a user can re-use.
Checking the checkbox “Enable Password and Account Protection” will prevent users from changing their own passwords or deleting their own accounts.
This can also be achieved using the following CLI commands:
ciscoasa(config)# password-policy minimum-length 12

ciscoasa(config)# password-policy minimum-changes 1

ciscoasa(config)# password-policy lifetime 1

ciscoasa(config)# password-policy minimum-uppercase 1

ciscoasa(config)# password-policy minimum-lowercase 1

ciscoasa(config)# password-policy minimum-special 1

ciscoasa(config)# password-policy minimum-numeric 1

ciscoasa(config)# password-policy authenticate-enable
Please note that users will need to change their existing passwords for the new password complexity policy to be applied.
Enforce Local Account Lockouts
Enforcing account lockouts protects the accounts against password guessing and brute force attacks. In combination with enforcing password complexity, this reduces the likelihood of an account being compromised using password guessing or brute force attacks.
Account lockout can be configured using the following steps in ASDM:
Configuration -> Device Management -> Users/AAA -> AAA Server Groups. Select the server group you want to edit, and check the “Enable account lockout” checkbox, then specify the number of login attempts before the account gets locked out in the textbox below.
This can also be achieved using the following CLI command:
ciscoasa(config)# aaa local authentication attempts max-fail 3
Account lockouts can be configured separately for the local database, and any central authentication protocols in use, such as RADIUS, TACACS+ or LDAP Administrative ports.
Restrict Access to Administrative Ports
Restricting access to administrative ports reduces the attack surface exposed by the device. Access to administrative ports should be restricted to trusted interfaces and/or IP addresses. By default, it is only possible to gain administrative access if there is a configuration entry that matches the protocol, interface and address that a user connects from. Cisco ASA does not check access control lists to allow or deny administrative access.
Access to an administrative port can be allowed from the ASDM using the following steps:
Configuration -> Device Management -> Management Access -> ASDM/HTTPS/Telnet/SSH. Click the “Add” button, and specify the access type, interface and IP address/range to allow access.
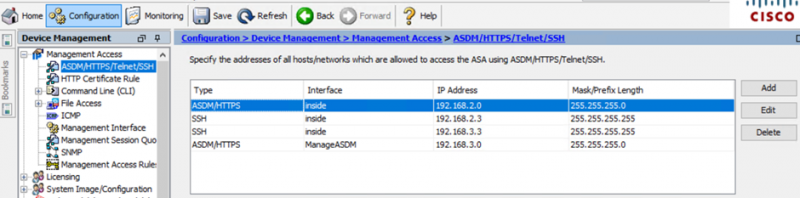
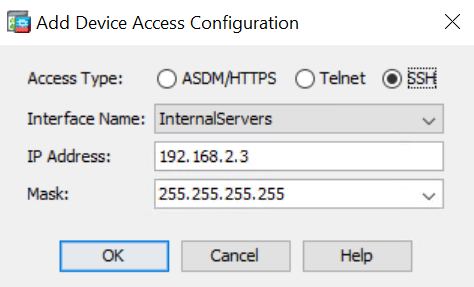
This can also be achieved using the following CLI command:
ciscoasa(config)# ssh 192.168.2.3 255.255.255.255 inside
Access to an administrative port can be blocked from the ASDM using the following steps:
Configuration -> Device Management -> Management Access -> ASDM/HTTPS/Telnet/SSH. Select the entry that you want to remove and click the “Delete” button.
This can also be achieved using the following CLI command:
ciscoasa(config)# no ssh 192.168.2.3 255.255.255.255 inside
This removes the administrative access entry that meets the given parameters. In this example this prevents users from logging in to the device using SSH from the IP address 192.168.2.3. A matching entry must exist to be removed.
It is important to note that no ACL rule needs to be created in addition to this to gain access. Not only that, but ACL rules are ignored for the purpose of admin access, if admin access is configured.
If an entry exists with “ssh 192.168.2.3 255.255.255.255 inside“, then that IP address can connect through the “inside” interface, even if there is an explicit ACL rule for the inside interface to deny access from that IP address, for example “access-list inside_in extended deny ip 192.168.2.3 255.255.255.255 any“. When revoking administrative access, ensure that it is correctly removed, and not just the access rules to permit this access are disabled or removed.
Ensure that administrative access is given to individual IP addresses instead of whole network ranges, and that regular firewall reviews are in place that include reviewing these access rights.
Disable Plain Text Protocols for Administrative Ports
Communication sent using plain text protocols could be sniffed by attackers. Cisco ASA allows a secure, encrypted alternative to every plain text protocol (such as SSH instead of telnet, secure copy instead of (T)FTP, and HTTPS instead of HTTP). Disabling plain text protocols is a quick win in terms of improving security.
All Telnet administrative access can be disabled from the ASDM using the steps described in the previous section. It is also possible to edit existing Telnet entries and change the protocol to “SSH“.

All existing Telnet administrative access entries can be removed using the following CLI command:
ciscoasa(config)# clear configure telnet
Note that Cisco ASA only allows HTTPS and not HTTP to connect to the ASA using ASDM. No configuration to the firewall is required. This is true even when you configure HTTPS access using the following CLI command:
ciscoasa(config)# http 192.168.2.3 255.255.255.255 inside
Restrict SSH to Version 2
SSH Version 1 is considered insecure for a number of reasons. A few examples are weak data integrity checks (enabling Session Hijacking), an integer overflow vulnerability and insufficient host key validation. SSH connections using version 2 can potentially be intercepted and forced to downgrade to version 1 by a malicious user. It is therefore recommended to restrict SSH access to version 2 only. This also enforces the use of SSH version 2 for SCP (Secure Copy Protocol) – making file transfers such as periodic firewall configuration backups more secure.
The SSH version can be configured from the ASDM using the following steps:
Configuration -> Device Management -> Management Access -> ASDM/HTTPS/Telnet/SSH. Under “SSH Settings“, change “Allowed SSH versions” from 1&2 to 2.
This can also be achieved using the following CLI command:
ciscoasa(config)# ssh version 2
Firewall Rules
Add Comments to Rules
Adding a clear description to every rule that shows ownership, date and purpose of the rule, or a ticket reference, is crucial for identifying whether a rule is still required or could potentially be removed. This facilitates housekeeping and general management of the firewall rules.
Adding comments to existing firewall rules can be achieved using the following steps in ASDM:
Configuration -> Firewall -> Advanced -> ACL Manager. Double click any rule – or right click and select edit – and insert a comment in the description field.
This can also be achieved using the following CLI commands:
1) Obtain the line number and details of the rule:
ciscoasa(config)# show access-list
2) Add the comment to the relevant rule
ciscoasa(config)# access-list inside_in line 5 remark this is a remark for the rule on line 5
This adds a comment to the rule on line 5 of the ACL “inside_in”. Cisco will add the remark in front of the specified line number, and increment all line numbers after the new remark.
For more information regarding adding comments (also known as remarks) to access lists, please refer to the following URL:
Remove Unused Filter Rule Sets
Unused filter rule sets make it harder to manage the rule sets effectively, as potentially active rules are still present, but they are not tied to an interface, and therefore they do not have any effect.
To remove unused filter rule sets, you can use ASDM to view the rule sets and remove them:
Configuration -> Firewall -> Advanced -> ACL Manager. Review the rule sets and verify that each rule set is attached to an interface. Interfaces can be shown as follows:
Configuration -> Device Setup -> Interface Settings -> Interfaces.
Note that ASDM removes any ACL automatically when the last rule is removed from that ACL. However, it is possible that access rules exist that are part of an ACL that was removed using a method different from ASDM.
To remove all access rules for a specific ACL that is no longer defined, the following CLI command can be used:
ciscoasa(config)# clear configure inside_in
Where “inside_in” is the name of the ACL. All rules that match this ACL are removed after issuing this command.
Remove Inactive Rules
Inactive rules make it harder to manage the firewall rule sets effectively.
Removing inactive rules can be achieved using the following steps in ASDM:
Configuration -> Firewall -> Access Rules. Right click the rule to be removed and select the “Delete” option. Inactive rules are shown using a strikethrough font.
This can also be achieved using the following CLI commands:
1) Output all inactive rules in the current running-config:
ciscoasa(config)#: show access-list | i inactive
2) Remove individual rules by prepending the “no” keyword. For example, in order to disable a rule defined as:
access-list inside_access_in line 1 extended deny ip host 192.168.2.3 any inactive
the following command can be used:
ciscoasa(config)# no access-list inside_access_in line 1 extended deny ip host 192.168.2.3 any
Apply an Explicit Default Deny Rule
A default deny rule ensures that traffic without specific rules to permit it, will get denied by default. Cisco ASA software adds an implicit deny all rule to the end of any configured ACL (this is a global deny all rule, and global rules get added to the end of all ACLs). However, if an interface has no ACL attached, then this global rule does not take effect for that interface. Furthermore, it is not possible to track the amount of hits for the implicit global deny all, and adding an explicit rule makes it possible to track the amount of traffic that was effectively denied, also known as “hits”. This is useful for monitoring the effectiveness of the deny rules, and identifying the nature of blocked traffic attempting to pass through the firewall. In addition to ensuring that every interface has an ACL linked to it, it is good practice to create an explicit deny all rule at the bottom of every ACL.
This can be achieved from the ASDM using the following steps:
Configuration -> Firewall -> Access Rules.
1) Under the relevant interface heading, add a new rule by clicking the “Add” button.
2) In the pop-up window, select the “Deny” action. Ensure that the Source and Destination criteria are set to “Any“, and that the service is set to “IP“.
This can be achieved from the CLI using the following command:
ciscoasa(config)# access-list inside_in line 100 extended deny ip any any
Where “inside_in” is the name of the ACL to add the rule to.
Ensure that the line number specified is higher than the current last line number in the ACL, so that this rule gets appended to the end of the rule set.
Restrict Overly Permissive Rules
Overly permissive rules are a risk to the organisation, as they allow unintended traffic to get through the firewall. An organisation should tighten overly permissive rules to the required source address(es), destination address(es) and service(s) or destination port(s). In order to achieve this without impacting the organisation’s operations or accidentally causing a denial of service, organisations should monitor the rules to identify traffic matching them. Rules should be monitored for a sufficient period of time as determined by the organisation. Once the data has been collected and analysed, the organisation can tighten the firewall rule to match the identified traffic. Organisations should consider using a remote syslog server to collect the logs and limit monitoring to a small number of rules.
The steps that we will follow in order to restrict existing rules are as follows:
1) Configure a Syslog server and enable logging to this server
Setting up central logging on a dedicated Syslog server allows us to collect logs for firewall rules over a longer period of time, and facilitates managing logs for multiple networking devices.
2) Enable logging for specific access rules
Every firewall rule can be configured to use a specific log level. By configuring firewall rules to be reviewed to use a particular logging level, such as “Notifications”, it is possible to collate only those logs that are related to the rules that need to be reviewed over a period of time.
3) Find logs for a specific filter rule
Using the hexadecimal identifier that is mapped to each rule with logging enabled, it is possible to search the central Syslog server for only the logs that are related to a specific filter rule.
4) Modify an existing rule
Once an overly permissive or no longer required rule has been identified, we can modify the rule in order to make it more restrictive.
Configure a Syslog Server and Enable Logging To This Server
The following steps can be used to configure a syslog server using the ASDM:
Configuration -> Device Management -> Logging -> Syslog Servers. Click “Add“, and specify the interface and IP address where the Syslog server is located. After adding a server, tick the checkbox at the bottom of the window “Allow user traffic to pass when TCP syslog server is down“. This ensures that traffic is not disrupted in the case of a syslog server outage.
Configuration -> Device Management -> Logging -> Logging Filters. Select the logging destination (e.g. “Syslog Servers”), and select a severity (e.g. “Notifications”).
This enables all events with the log severity that was chosen to be sent to the specified log destination.
A syslog server can be configured from the CLI using the following commands:
ciscoasa(config)# logging host ManageASDM 192.168.2.7

ciscoasa(config)# logging trap Notifications

ciscoasa(config)# logging permit-hostdown
Where “trap” is the destination server (e.g. Syslog server), and “ManageASDM” is the name of the interface that the logging server is located at.
Next, ensure that logging is enabled. The following steps can be used to do this using the ASDM:
Configuration -> Device Management -> Logging -> Logging Setup. Tick the “Enable Logging” checkbox. Also tick the “Enable logging on the failover standby unit” checkbox.
This can also be achieved using the following CLI commands:
ciscoasa(config)# logging enable

ciscoasa(config)# logging standby
Enable logging for specific access rules
The follow steps can be used to enable monitoring on a specific filter rule using the ASDM:
Configuration -> Firewall -> Access Rules. Right click a rule and select edit. Tick the “Enable Logging” checkbox, and set the logging level through the drop-down menu (e.g. “Notifications”).
Monitoring can be enabled on a specific filter rule from the CLI using the following command:
cisoasa(config)# access-list inside_in line 1 extended permit ip any log 5 interval 300
Where 5 is the level of logging. This number can range from 0 (Emergencies) to 7 (Debugging).
Find logs for a specific filter rule
Rules are given a hexadecimal value to help track which logs relate to which rule.
The identifier for a specific filter rule can be found in the following way using the ASDM:
Configuration -> Firewall -> Access Rules. right click on the rule and select “show log“. This will show the hexadecimal value of the rule as a default filter, for example “0x77c0932c“. The same value can be used within the Syslog server to search for logs related to this filter rule.
The identifier for a specific rule can be found through the CLI in the following way:
ciscoasa(config)# show access-list inside_in
The hexadecimal value will be at the end of the rule where logging was enabled.
Modify an existing rule
The following steps can be used to modify a filter rule using the ASDM:
Configuration -> Firewall -> Access Rules. Right click the rule to be modified, and select “Edit“. Refine the parameters such as “Destination” and “Service“, and click “Ok” to confirm.
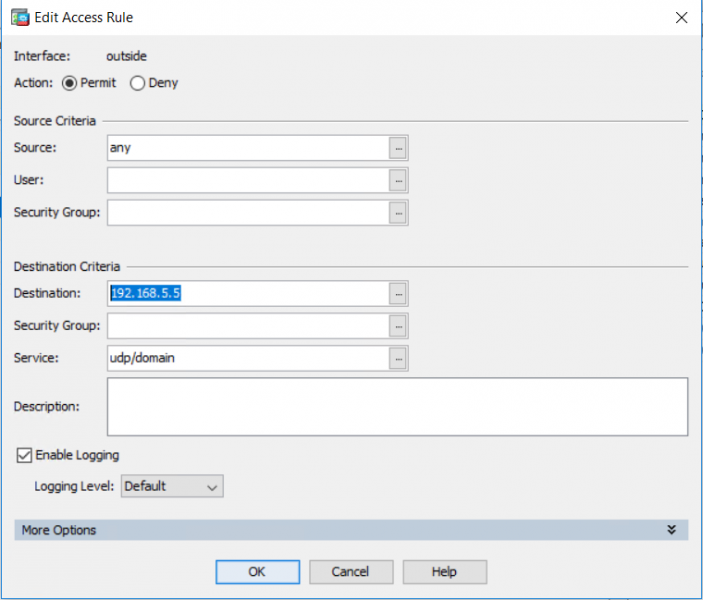
Filter rules can be modified from the CLI in the following way:
Suppose that a rule was identified that allows access to a network range instead of a specific host IP address that is required. An example of such rule is as follows:
access-list outside_access_in line 2 extended permit ip any 192.168.5.0 255.255.255.0
We can refine this rule by removing it, and recreating it with the new desired parameters:
ciscoasa(config)# no access-list outside_access_in line 2 extended permit ip any  192.168.5.0 255.255.255.0 log 5 interval 300
ciscoasa(config)# access-list outside_access_in line 2 extended permit ip any host 192.168.5.5
Note that we have removed the logging (“log 5 interval 300″) for this rule, as we have identified and restricted it successfully.
This log monitoring approach can also be useful to identify whether existing rules where the purpose is not clear (e.g. rules without a comment, or rules that are transferred from old hardware) are still required.
Firewall Rules Good Practices
Restrict Internet Access to the Web Proxy
Allowing internal users to freely access the Internet could result in them accidently visiting phishing websites or malicious websites hosting malware which could lead to the compromise of the internal network.
In addition to enforcing the use of a Web Proxy through Group Policy, it is recommended to also enforce this on the boundary firewall to ensure that it cannot be bypassed. This can be achieved by only allowing the proxy’s address to access external websites using HTTP or HTTPS protocol and preventing all other internal hosts from sending traffic to external destinations using HTTP or HTTPS protocol.
Restrict Access to High Risk Ports from External Untrusted Sources
Ports can be considered high risk for a number of reasons. They are used by clear-text protocols, allow privileged access, or are commonly targeted by attackers because of the popularity or vulnerabilities of the underlying software. It is recommended to restrict access to such ports/services to trusted sources in order to reduce the potential attack surface exposed by the organisation.
An example of ports that can be considered high risk is shown below:
- HTTP (TCP 80, 8080)
- RDP (TCP 3389)
- Telnet (TCP 23)
- FTP (TCP 21)
- TFTP (UDP 69)
- VNC (5900-590x)
- SMB (TCP 445, 1137, 139, UDP 137, 138)
- Kerberos (TCP 88, UDP 88)
- SSH (TCP 22)
- LDAP (TCP/UDP 389)
Please note that this is not an exhaustive list.
Restrict Outbound Traffic from the Internal Network or DMZ
Overly permissive rules from the internal network to external sources could allow data to be exfiltrated from the internal network, as well as allow compromised hosts to communicate with command and control servers. Outbound traffic from the internal network and DMZ should be restricted to the resources and services required by users to carry out their job.
Understand Security Levels and Implicit Deny Rules
Security levels can be applied to interfaces from 0 to 100. By default, outside would be 0 and inside would be 100.
An interface cannot send traffic to interfaces with a higher security level (so 50 can’t send to 100) unless there is a firewall rule that permits the specific traffic. Interfaces with the same security level may be able to send traffic to each other, depending on whether same-security-traffic is configured.
However, security levels only apply if there are no ACLs applied to the interface – if there are then the security level is ignored and the ACLs are processed instead.
Ensure that every active firewall interface has an ACL attached. Attaching an ACL to an interface always appends the global implicit deny all rule, thus allowing more fine-grained control over the traffic that is permitted through this interface.
Securing SNMP
A weak SNMP configuration could allow attackers to gain valuable insight into the network, as Cisco ASA’s can send a lot of device information and status messages to SNMP Managers. In the case of read access, this could give an attacker valuable intelligence that allows further exploiting of the device. In the case of read/write access, the risk is much higher as an attacker would be able to perform a variety of actions, such as rebooting the device, shutting down interfaces or resetting passwords. Fortunately, SNMP write access cannot be enabled on Cisco ASA devices.
Use SNMPv3
A crucial weakness of SNMP version 1 and 2 is that the communication is sent in clear-text over the network using the UDP protocol. An attacker that is able to sniff the network can therefore obtain the private community strings which can be used to query the device. Version 3 offers authentication and encryption features to mitigate this risk. Ensure that the ‘auth’ and ‘priv’ options are enabled when configuring SNMPv3. Setting up SNMPv3 can be achieved using the following steps in ASDM: Configuration -> Device Management -> Management Access -> SNMP.
1) Under the “SNMPv3 Users” section, click the “Add” button within the “USM Model” tab selected to create a new group. Enter the group name, and ensure that the security level is set to ‘priv’ (authentication and privacy/encryption enabled).
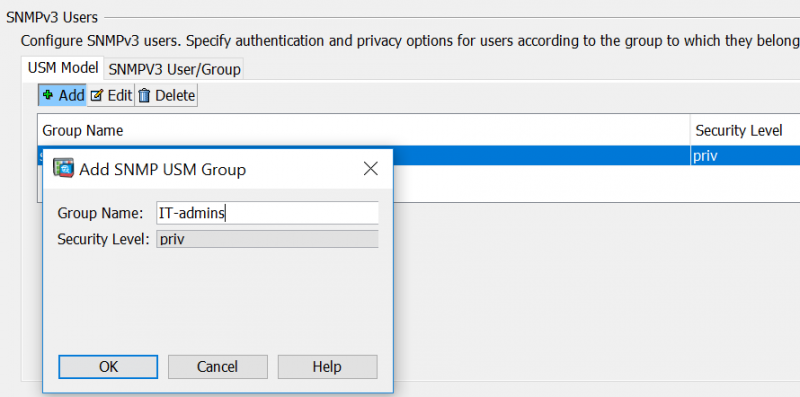
This can also be achieved using the following CLI command:
hostname(config)# snmp-server group IT-admins v3 priv
Where “IT-admins” is the name of the group to be created.
2) Next, select the “SNMPV3 User/Group” Tab under the same section, and click the “Add” button. Enter the user details, and ensure that “plain-text” is selected. Note that this does not mean the password is stored or transmitted in plain-text, but is related to the format of the password that is entered in the text fields. Ensure that the SHA hashing algorithm and AES encryption algorithm are selected.
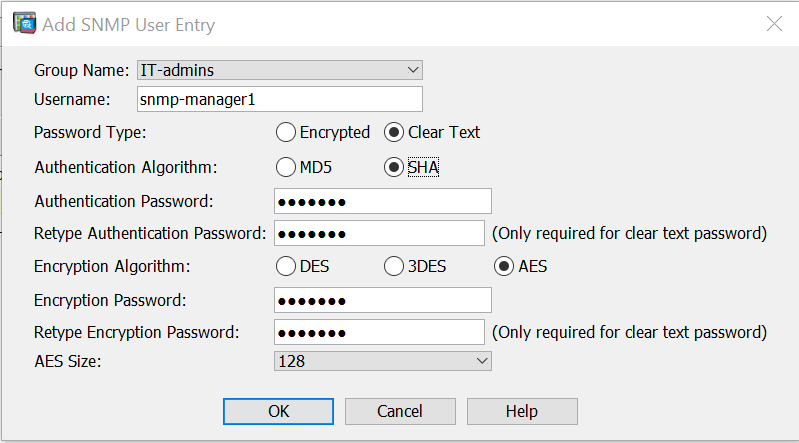
This can also be achieved using the following CLI command:
hostname(config)# snmp-server user snmp-manager1 IT-admins v3 auth SHA user_password priv AES 128 encryption_password
Where “snmp-manager1” is the desired username, “IT-admins” is the previously created group to add the user to, “user_password” is the password to authenticate the user, and “encryption_password” is the password to set up AES encryption.
3) Finally, click the “Add” button in the “SNMP Host Access List” section, and enter the IP address and interface of the SNMP Manager that should receive SNMP traps. Ensure that version 3 is selected, and pick the previously created user by clicking the “…” button next to the “Username/Group” text field. Untoggle either “Poll” or “Trap”, depending on the desired configuration and click “OK”.
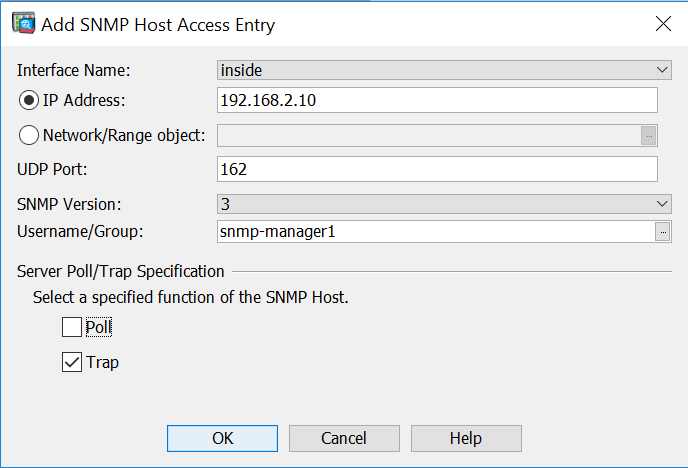
This can also be achieved using the following CLI command:
hostname(config)# snmp-server host inside 192.168.2.10 trap version 3 snmp-manager1
Where “inside” is the interface, “192.168.2.10” is the IP address of the SNMP manager that should receive the traps, and “snmp-manager1” is the previously configured username.
Use strong non-default community strings
When an upgrade to SNMPv3 is not possible – for example when this is not supported by your SNMP Manager – it is important to put compensating controls in place to mitigate this risk as much as possible until an upgrade is completed. The SNMP protocol has no account lockout feature built in, so an attacker can indefinitely run brute-forcing or password-guessing attacks on the community strings. This stresses the importance of using complex community strings. Ideally these should use a combination of uppercase, lowercase, numeric and special characters with a length of 20 or more. Changing a community string can be achieved using the following steps in ASDM: Configuration -> Device Management -> Management Access -> SNMP. Click the “Add” button in the “SNMP Host Access List” section, and double click the entry that you wish to change the community string of. Update the text field following “Community string”, and click “OK”. This can also be achieved through the CLI in the following way: It is assumed that an existing host entry exists as follows:
snmp-server host inside 192.168.3.10 trap community public version 2c
To reconfigure the weak community string “public”, the following command can be used:
hostname(config)# snmp-server host inside 192.168.3.10 trap community new_password version 2c
Where “new_password” is the new community string to be configured.
Restrict hosts that are allowed to poll or receive traps
Cisco ASA allows adding single hosts or already defined network groups that are able to receive SNMP traps. Ideally, all network management communication should be done through a separate management network that is connected to its own interface. When this is not possible, ensure that SNMP is restricted to trusted hosts only. It is possible to review the current SNMP configuration using the following steps in ASDM: Configuration -> Device Management -> Management Access -> SNMP. Review the list under the “SNMP Host Access List” section for undesired hosts or network ranges. An allowed host can be removed by selecting it, and clicking the “Delete” button. This can also be achieved using the following CLI commands:
hostname(config)# show running-config snmp-server host
Remove an entry by prepending it with the “no” keyword (the community string can be omitted). For example, assume the following allowed host needs to be removed:
snmp-server host inside 192.168.3.10 trap community ***** version 2c
The following command removes this host from the Access List:
hostname(config)# no snmp-server host inside 192.168.3.10 trap version 2c