

In the previous blog post, we have discussed the steps in identifying sensitive information in file shares, as well as file servers with inappropriate access controls configured. It was aimed to provide organisations with a guide on how to perform internal file share audits. Dionach have now released a tool, ShareAudit, to further improve the process of performing these audits. The tool is now publicly available on GitHub.
This blog post aims to provide organisations with a guide on how to use ShareAudit to test access control mechanisms implemented on internal systems. As ShareAudit is a Windows-based tool, the actions detailed in this blog post will be performed on a machine running a Windows 10 operating system. Please note that ShareAudit requires the .NET framework runtime to be installed on the host machine, the installer can be downloaded from Microsoft’s official website.
PERFORMING THE AUDIT
The Zenmap GUI tool can be used to scan local networks to identify file servers within it. This is extremely useful to organisations with a large amount of systems. Zenmap can be installed from the official nmap website.
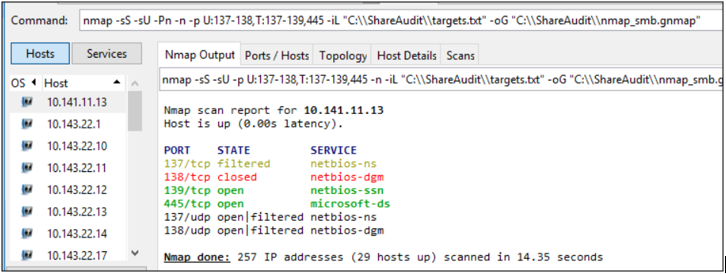
A text file with the list of network ranges will need to be created as the targets used for scanning. In this example, the necessary information will be stored on the file at “C:\ShareAudit\targets.txt”. Install and run Zenmap as per the below example, where Zenmap has been configured to scan the network ranges specified in the “targets.txt” file and writing the output to the “nmap_smb.gnmap” file.
nmap -sS -sU -Pn -n -p U:137-138,T:137-139,445 -iL “C:\\Path \\To\\Target.txt” -oG “C:\\Path\\To\\OutputFile.gnmap”
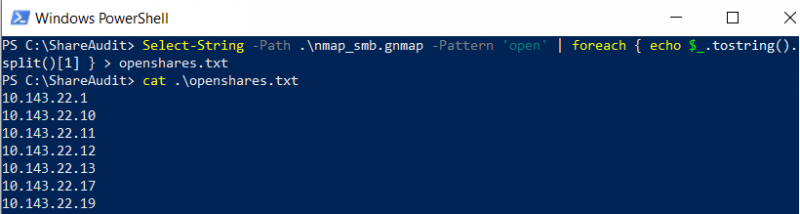
The list of IP addresses of identified file servers can be filtered, and the output written to a file (“openshares.txt” in this example) with the following PowerShell command:
Select-String -Path .\nmap_smb.gnmap -Pattern ‘open’ | foreach { echo $_.tostring().split()[1] } > openshares.txt
Once the file servers have been enumerated and identified, the list of IP addresses can then be scanned with ShareAudit to find files with sensitive information.
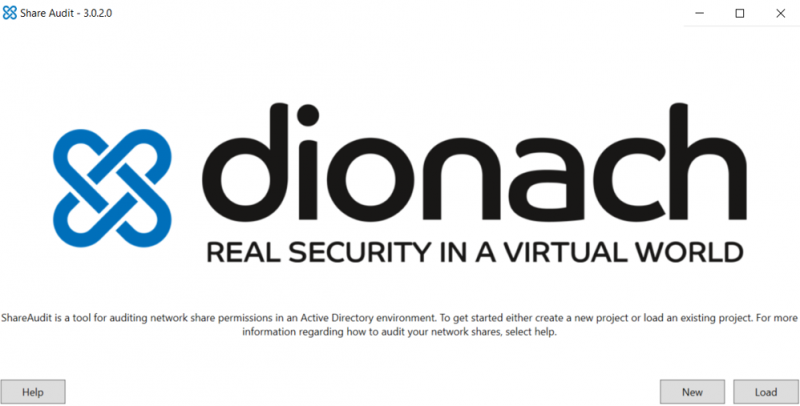
Launching ShareAudit shows a splash screen with options to create a new share audit project or to load the results of a previously done audit.
Upon creating a new share audit project, the following screen is shown. Various configurations can be tailored here to suite each individual audit.
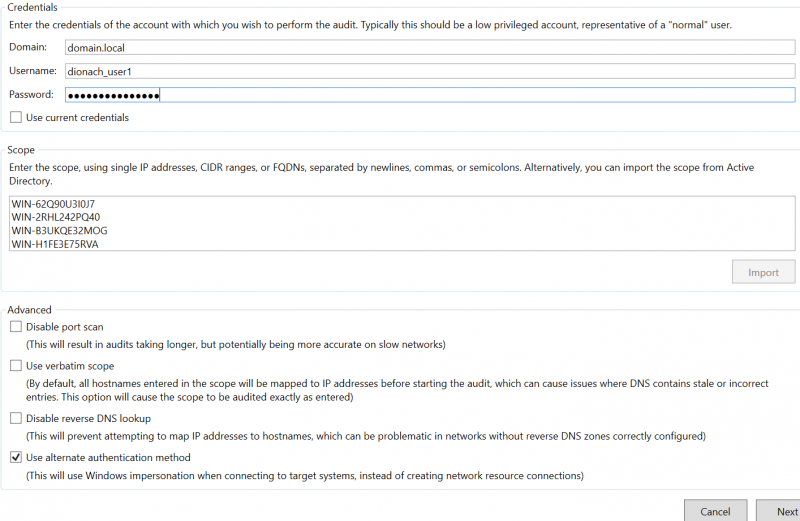
The configuration options are split into the following sections:
Credentials
In this section, users can choose either to use specific credentials, or to use the credentials of the current logged in user to perform the audit. Performing the audit by using specific credentials may be useful for organisations to test file share access controls from the perspective of different types of users.
Alternatively, tick the “Use current credentials” box to allow ShareAudit to use the credentials of the current logged in user. Users should double check the privileges the current logged in user has, as file share audits should be performed with user accounts that has standard or low user privileges to file shares.
Scope
This section defines the list of hosts to audit with ShareAudit. Several options can be considered for this configuration. The list of IP addresses from the nmap scans performed in earlier stages of this blog post can be used by simply copying and pasting the output of “openshares.txt” into the scope field.
Alternatively, IP address ranges or subnets can be used. ShareAudit will perform a scan of the CIDR ranges provided. Fully Qualified Domain Names (FQDN) could also be used to perform an audit of the entire network domain.
Users could also import targets directly from within the Active Directory. This can be done with the “Import” button at the bottom right corner of the scope section. The options to import servers, workstations, or all machines within the domain will be available. Please note that the domain and credentials fields are required prior to clicking the “import” button in the previous screen. At the time of writing, ShareAudit retrieves target machines from within the domain by initiating a Lightweight Directory Access Protocol (LDAP) connection to the Domain Controller (DC). This is done by using the credentials provided and searching for the objects classed as “Computer”, in addition to the Operating Systems filters below. Provided that either servers or workstations are selected to be imported:
Servers
Windows Server*
Workstations
Windows XP* or Windows Vista* or Windows 7* or Windows 8* or Windows 10*
All
All of the above
Advanced
Disable port scan
Enabling this option will allow ShareAudit to attempt connection to each individual host defined in the scope on port 445. This is done to determine whether the target hosts have file shares enabled. You may have realised that ports 137, 138 and 139 were scanned with Zenmap in earlier stages of this blog post. File sharing can be done on all these ports.
Without diving in depth on the differences between TCP ports 137, 138, 139 and 445, TCP ports between 137 and 139 are NetBIOS ports that operate on the transport layer of the OSI model, which allows computers on the same network to communicate with each other. Whereas TCP port 445 operates directly on the TCP/IP stack, and allows file sharing to be done over the Internet. If this configuration is left unticked, the audit will take longer to finish as ShareAudit will attempt a port scan on each individual host defined in scope.
Use verbatim scope
By default, all hostnames entered in the scope will be mapped to IP addresses before the audit is started. As Windows caches DNS entries locally, this could cause issues if these entries contain stale or incorrect values. Enabling this option will allow ShareAudit to perform the audit on the hosts exactly as how it is entered in the scope.
Disable reverse DNS lookup
By default, ShareAudit will attempt to map IP addresses to hostnames, which can be problematic in networks without reverse DNS zones correctly configured. Enabling this option will prevent ShareAudit from mapping IP addresses back to hostnames.
Use alternate authentication method
This option will be enabled by default when credentials are provided in the credentials section of the configuration. Enabling this option will allow ShareAudit to use Windows impersonation when connecting to target systems defined in scope. This means that the audits will be performed with the privileges of the user account specified in the credentials.
Additionally, ticking the “Use current credentials” box will disable this option as Windows impersonation will no longer be required for the audit.
After the share audit configuration is complete, click the “Next” button at the bottom right corner of the window to start the audit.
Results
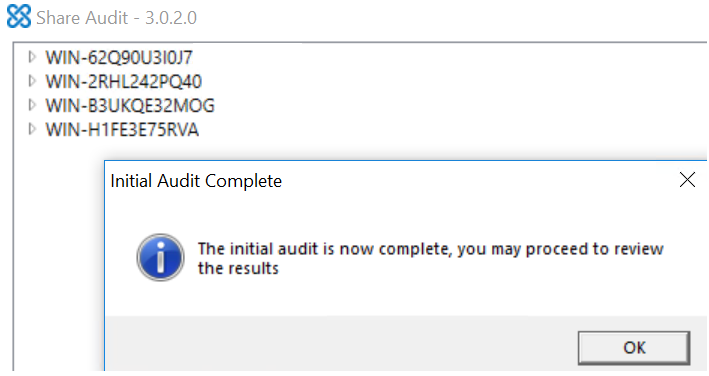
A pop-up box will be presented to users upon completion of the audit, as shown below:
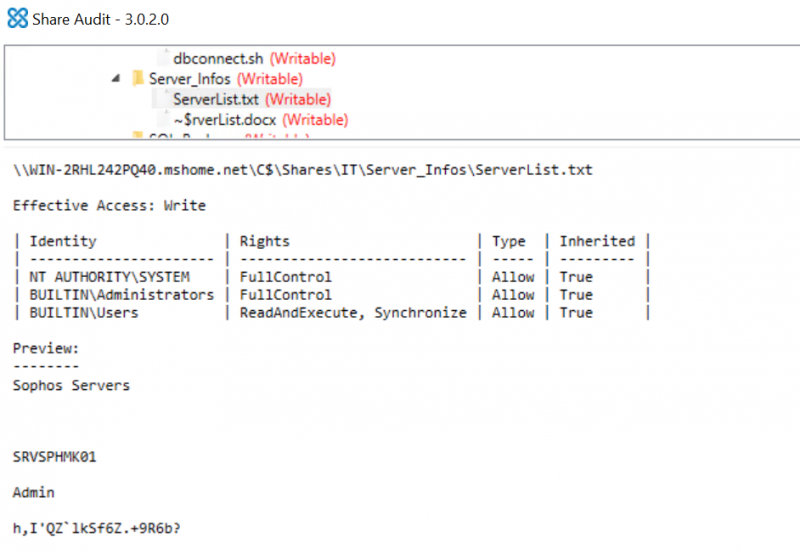
Users can now go through the results, expanding each folder in order to identify files containing sensitive information. A preview pane will also be available to show access privileges and the contents of the selected file, as shown below. Please note that the preview pane only shows partial contents of the selected file, as previewing the full content of selected files could cause excessive CPU overhead if files contain large amount of data.
Please note that by default ShareAudit only perform scans of two levels of folders. As such, users will be required to perform audits on additional folders by right clicking on the desired folder and clicking on the “Audit Folder” option, as shown below. At the time of writing, this will only show the contents of the selected folder. Users will be required to manually audit any subsequent folder to figure out its contents.
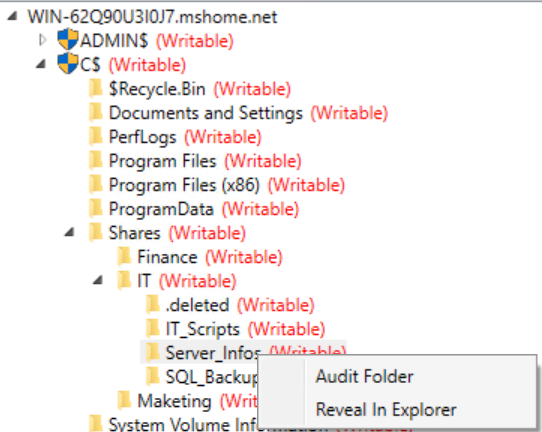
Additionally, users could also select the “Reveal In Explorer” option to open the folder in Windows Explorer, instead of relying on the user interface offered by ShareAudit.
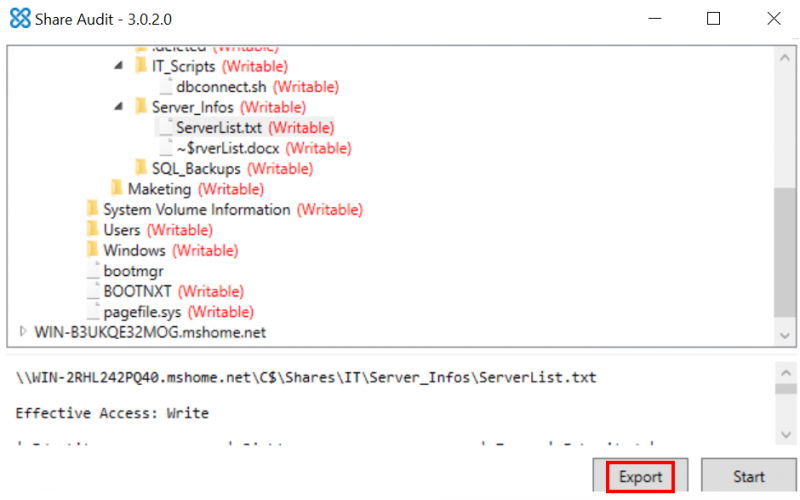
ShareAudit also provides the option of exporting the audit results. This can be done by simply clicking the “Export” button on the bottom right corner of the window, as shown below.
Conclusion
Organisations should audit their file servers regularly, for instance every three months, either by performing audits internally or by using external contractors. This is to ensure that inappropriate permissions have not been granted to specific users within the domain, as staff within organisations tend to request additional and temporary permissions to sensitive information from time to time and permissions are left granted after the required period. Additionally, staff who have moved departments within an organisation may also retain permissions to sensitive information after leaving certain teams or departments. This may occur due to their user accounts being left assigned in previous user groups within the Active Directory.
Dionach recommends performing these audits by creating test users and assigning them to different user groups within the domain. This will be effective in simulating employees or contractors requiring access to organisation resources stored in the file servers.
Performing these audits will also aid in configuring the appropriate access controls for file servers within the domain. Applying strict permissions on the file servers can help protect sensitive and confidential files from disgruntled employees that would attempt to steal intellectual property out of the organisation’s network.

 2025/2026 CAF")
