
When carrying out internal penetration testing engagements, one of the first areas a penetration tester will focus on is identifying which shares are accessible to low privileged domain users or anonymous users in the hope of finding sensitive information such as passwords, backup files or confidential documents. What confidential information can be found depends on the nature of the organisation that is being targeted. By performing these steps, an attacker can quickly escalate their privileges within an organisation, which sometimes leads to a full domain compromise. This could be achieved through the use of hardcoded domain admin passwords found in start-up scripts for example.
This blog post aims to provide organisations with an insight in how to identify sensitive information in network shares. As such, organisations could follow this as a guide to periodically review their own network shares to ensure access control is enforced appropriately and consistently all the time.
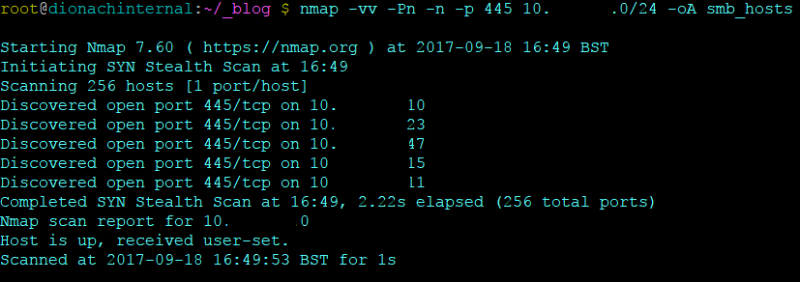
A number of open source tools are available to perform auditing of network shares, and in order to start using these tools, it is important especially for large organisations to identify all the network shares in their infrastructure and identify sensitive information contained within them. The first stage in this process can be achieved by using Nmap, a well known network scanner, to scan whole network spaces (for example 10.10.10.0/24) for systems listening on the SMB port 445.
$ nmap -vv -Pn -n -p 445 10.10.10.0/24 -oA smb_host
The following command can then be used to parse out all of the hosts which have SMB open on the network:
$ grep open smb_host.gnmap | awk {'print $2'} > smb_up.txt && cat smb_up.txt
Once network shares have been enumerated the next step is to identify sensitive information. The open source tools that will be demonstrated in this blog post come from an offensive PowerShell project used to perform penetration testing tasks on organisations, showing how an attacker can use trusted Microsoft tools such as Active Directory modules to perform a number of tasks. The repository can be found from the link below:
https://github.com/PowerShellMafia/PowerSploit
The repository above includes a number of useful tools attackers can leverage to perform offensive tasks, the functions relevant to auditing network shares are called Invoke-ShareFinder and Invoke-FileFinder. The following examples explore how these cmdlets are used, in order to first use these tools a PowerShell process is needed which has to run in the context of the domain user account used for testing access to shares. Typically this should be a low privileged temporary test account specifically created for the file shares assessment. It is possible to achieve this by using the runas command in Windows, as shown below:

Now that the PowerShell process is running as the test domain user, it is possible to load the PowerSploit files and access the relevant cmdlets for performing the share audit.
In the above command the “-exec bypass” flag was used to ensure that execution policies are not enforced.
Once it is possible to load and execute scripts, we can use PowerShell scripts from the PowerSploit project; the script we will be leveraging is called PowerView.ps1. In this script are a number of helpful cmdlets we can use to audit the network shares. The PowerView PowerShell script can be taken from the following URL:
https://github.com/PowerShellMafia/PowerSploit/tree/master/Recon
Before using the PowerView.ps1 script an amendment needs to be made to enable it to deal with the trailing space and share information inserted after the UNC path to each share by the Invoke-ShareFinder cmdlet.
Do this by opening up PowerView.ps1 in, for example, Notepad++ and inserting the text below between lines 11438 and 11439.
        # PATCHED HERE TO FIX TRAILING WHITESPACE AND SHARE INFO
        $Shares += $Share.Trim('')
This section of the script should now read:
        # if we're hard-passed a set of shares
        if($ShareList) {
            ForEach ($Item in Get-Content -Path $ShareList) {
                if (($Item -ne $Null) -and ($Item.trim() -ne '')) {
                    # exclude any "[tab]- comments", i.e. the output from Invoke-ShareFinder
                    $Share = $Item.Split("`t")[0]
            # PATCHED HERE TO FIX TRAILING WHITESPACE AND SHARE INFO
                    $Shares += $Share.Trim('')
                 }
             }
          }
The script can then be passed into the PowerShell runtime space using, for example, the command below:
PS > c:\Recon\PowerView.ps1
Note that if the PowerShell script is in the working directory then the syntax of “.\PowerView.ps1” must be used to invoke the script into the PowerShell runtime environment.
Note also that the Recon folder within the PowerSploit repository also includes “.psm1” and “.psd1” files which can be used to import all the PowerShell scripts within the PowerSploit Recon folder. The “psd” file type is used for describing the contents of a module such as version information and the minimum PowerShell version it can run as. This will load all the cmdlets within the ps1 file above into the PowerShell runtime environment.
Now it is possible to run the commands below to conduct the share audit:
$ Invoke-ShareFinder -ComputerFile smb_up.txt -NoPing -CheckShareAccess | Out-File -Encoding ascii found_shares.txt

In the example above a list of computers (“smb_up.txt”) that was retrieved from the previous Nmap scan is passed as input to the Invoke-ShareFinder cmdlet. Using the NoPing flag, the function will not perform ping scanning as this was already done during the Nmap scanning. The CheckShareAccess argument is then added in order to return a list of shares only the low privileged testing user will have read access to. The command above will provide a list of accessible shares which can then be used in the cmdlet “Invoke-FileFinder”to look for files whose names may indicate that they contain sensitive information, as shown below:
$ Invoke-FileFinder -ShareList found_shares.txt -Terms backup, confidential, password -OutFile results.csv -Verbose

The Invoke-FileFinder example will take a list of the shares found previously and look at all of the filenames within these shares which match a particular word such as “backup” or “password” provided through the Terms argument. When looking for useful information there are a number of file types which prove to be useful, such as scripts like .vbs, .bat or document files such as .xls, .txt or configuration files such as .conf and .ini. One could then browse the results and consider whether the identified files and folders should be accessible to the test user.
Please note that the Invoke-FileFinder cmdlet will only search for filenames, and it will not scan the file contents. Searching the file contents can be achieved in various ways. For instance, Notepad++’s recursive features could be used to identify sensitive content within files by providing it with a network share’s UNC path as shown below:
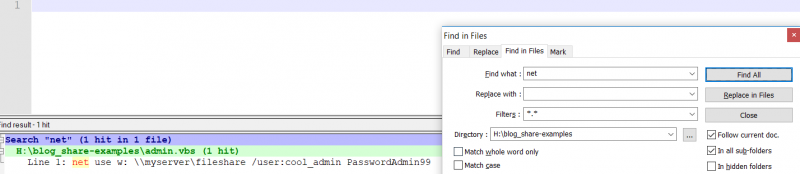
This is particular useful for finding hardcoded passwords such as those commonly found in administrator scripts which invoke Windows commands such as “net use”.

Note that the Windows search functionality can be also configured to search within file contents, this can be usually configured through Windows’ search advanced options.
It is also useful for organisations to understand what permissions folders and files may have, in order to determine who has the ability to perform actions on them such as writing. Write permissions could have serious implications for an organisation, for example allowing ransomware to encrypt large numbers of files through overly permissive network shares. To get a list of permissions for a given file or folder found in a share, the Get-Acl cmdlet built into PowerShell can be used, the following demonstrates this:
$ Invoke-FileFinder -ShareList found_shares.txt -Terms backup, confidential, password, Photos -Verbose | ForEach-Object {Get-Acl $_.FullName} | Format-List

In the example above, the test user has full control over the “backups.zip” file and is allowed to perform a number of actions such as deleting, as they are the owner of this file. Additionally, Enterprise admins are also allowed to perform these actions also. Using the command above it is possible to list all groups and users who have permissions for the shares found, and this can help to identify those users which have been granted permissions which they may not need. For more information about Windows file and folder permissions, please refer to the following article from Microsoft:
https://msdn.microsoft.com/en-us/library/bb727008.aspx
Rather than just outputting to a screen, permissions on each of the shares can be written to a CSV file by using the following:
PS> Invoke-FileFinder -ShareList .\found_shares.txt | ForEach-Object {Get-Acl $_.FullName} | Select-Object -Property Path,Owner,Group,AccessToString | Export-Csv Permissions.csv
The file will include the path to each shared file or folder, the owner, the group, and the ACL for the file or folder.
Organisations should audit their network shares periodically, for instance every three months, to ensure that file permissions are consistent and appropriate and that sensitive information is not accessible to unauthorised users such as low privileged domain users. Organisations performing these audits would have a clearer understanding of their network shares and have more control, as they will know which shares contain sensitive information. Additionally, over time, as permissions on network shares improve, the network should become better protected against mass compromise of information due to ransomware or malware attacks. Applying strict permissions on network shares would also reduce the risk of disgruntled employees stealing intellectual property or other sensitive documents out of the network.

 2025/2026 CAF")
