

INTRODUCTION
Firewalls are used as the main defence for an organisation’s network infrastructure, and are used to prevent unauthorised access to or from the private network. The aim of this article is to provide guidance for network administrators on how to harden Sophos UTM firewalls. Sophos is just one of the vendors that provides such solutions to many organisations, alongside Check Point, FortiNet, Juniper, and Cisco.
There is a command line interface for Sophos UTM, however Sophos are understood to prefer supporting the GUI and provide documentation for this approach, as such it will be used for this guide. Please note that the following recommendations were verified against a Sophos UTM 9 appliance. As such, the menus might differ for other versions.
ACCESS CONTROL
Configure CENTRAL Authentication
The use of a central authentication service allows organisations to easily and centrally manage user accounts. This simplifies account management processes, such as by ensuring that users’ accounts can easily be disabled across all network devices once they leave the organisation.
We will discuss three common methods for configuring central authentication in Sophos: TACACS+, RADIUS, and LDAP.
TACACS+
1) Create a new authentication server
To configure Sophos UTM to use TACACS+, you can use the following steps in WebAdmin:
Go to Definition & Users -> Authentication Services -> Servers. Click “New Authentication Server“, and choose the TACACS+ protocol in the dropdown menu in Backend.
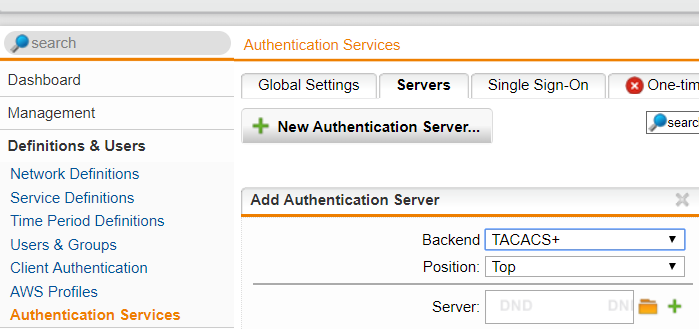
2) Configure the TACACS+ server:
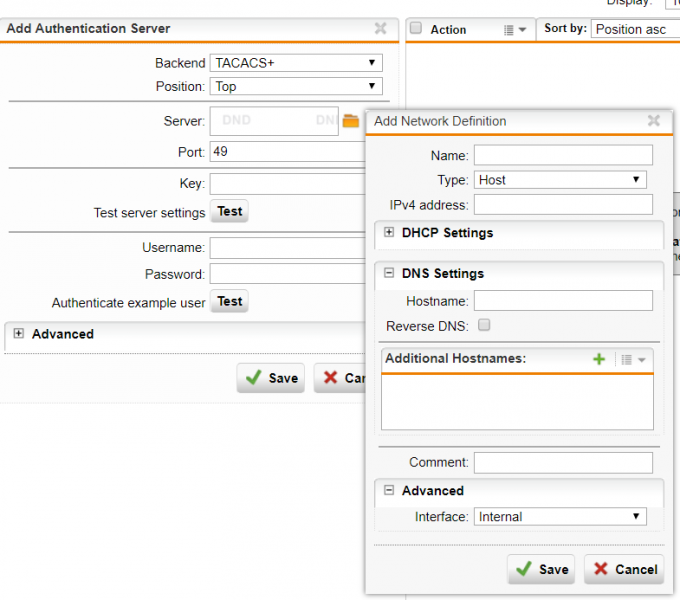
Click the green plus button to enter the IPv4 address of the TACACS+ server and specify a name in the “Name” field.
To enter the host name instead of the IPv4 address, choose “DNS Host” from the drop down list “Type”.
Choose the interface you wish users to be authenticated from in the “Advanced” tab, then add the TACACS+ server name and IP Address and the TACACS+ parameters, for instance the port number and symmetric server secret key, which would be supplied by the TACACS+ server administrator.
Please refer to section 5.7.2.5 TACAS+ in the following documentation for more information on how to configure TACACS+:
https://www.sophos.com/en-us/medialibrary/PDFs/documentation/utm9501_manual_eng.pdf
RADIUS
The way to configure RADIUS authentication in Sophos UTM is similar to TACACS+. In the drop down list for “Backend”, select RADIUS and configure the rest of the parameters using the same steps that were used for TACACS+. Please refer to the following URL for more information:
https://community.sophos.com/kb/en-us/116144#Configure%20Radius%20Server%20(UTM)
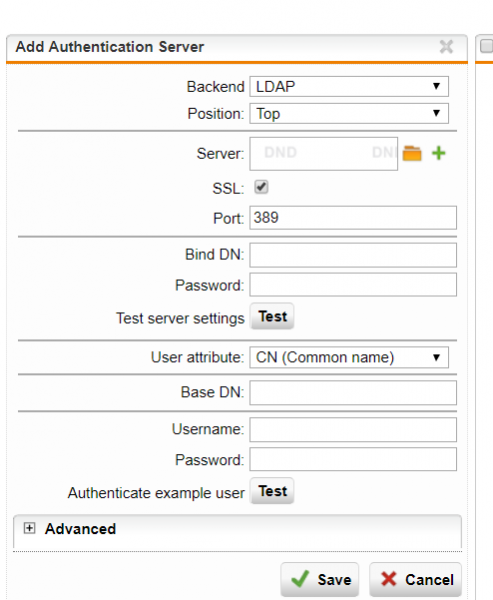
LDAP
To configure LDAP for Sophos UTM, please refer to Section 5.7.2.3 LDAP in the following article:
https://www.sophos.com/en-us/medialibrary/PDFs/documentation/utm9501_manual_eng.pdf
Please note that by default, plain text communication is used to communicate with the LDAP Server which would cause administrative credentials and sensitive configuration to be sent across the network unencrypted and so be vulnerable to interception. To address this, enabling SSL for LDAP requests can be done by checking the box marked “SSL” as highlighted.
ASSIGNING INDIVIDUAL LOCAL ADMINISTRATOR ACCOUNTS
Assigning individual administrator accounts ensures that every action can be traced back to the user who is responsible for making that action. Additionally, different privilege levels can be assigned to individual users to only grant the access needed for their role. In combination with user authorisation, this allows fine-grained control over the operations that are accessible to each user, ensuring that the principle of minimal privilege can be enforced.
To create an administrative account using WebAdmin, perform the following steps. Note that privilege levels can range from Read-only, Help Desk, Admin and Super Admin, with Super Admin being the highest level of access possible:
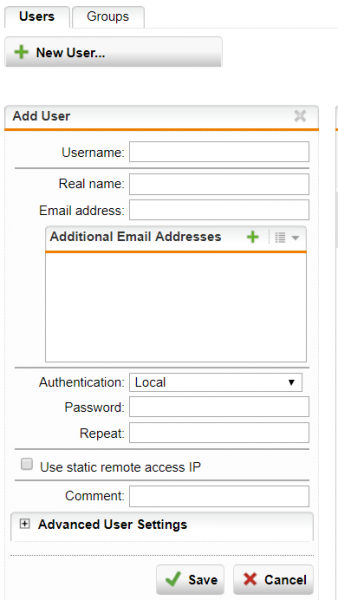
1) Go to Definition & Users -> Users & Groups
2) Click “New User” to create a new user.
3) Within the identity window you can fill in the username and password.
4) Save the newly created user, and click on the “Groups” tab at the top. The group “SuperAdmins” will appear in the list.
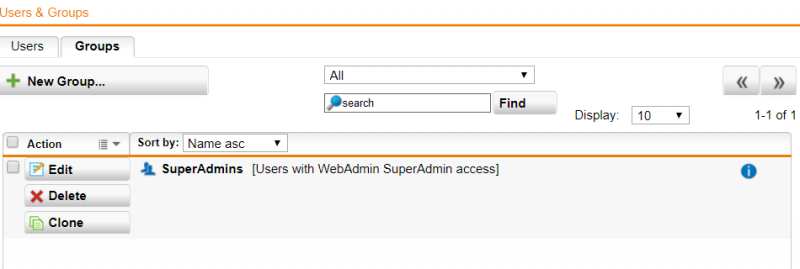
5) Click on “Edit” to edit the user group and click on the browse button. The list of users available will appear on the left, drag the new user in the “Edit Group” window
6) The new user will be added to the list, click “Save“.
For more information on how to configure administrator accounts within Sophos UTM, please refer to the following URL:
https://community.sophos.com/kb/en-us/131888
ENFORCE PASSWORD COMPLEXITY
Enforcing password complexity rules that comply with the organisation’s password policy ensures that the accounts are protected using complex passwords, that are difficult to guess or brute force. Password complexity is often in place on Windows Active Directory, but overlooked on networking devices.
Password complexity can be configured using the following steps in WebAdmin:
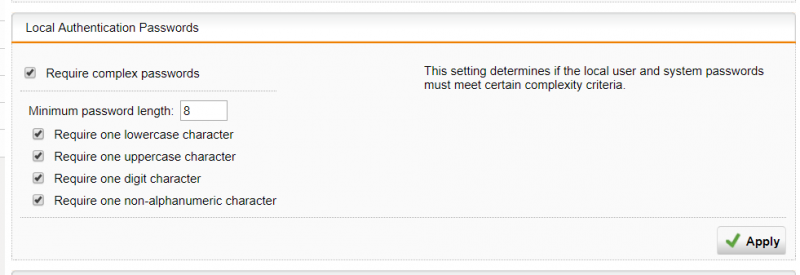
Go to Definitions & Users -> Authentication Services -> Advanced. Within the GUI you can set a number of options, which are listed below:
- Password length (1-32)
- Lower case characters (a-z)
- Upper Case Characters (A-Z)
- Digits (0-9)
- Non alpha-numeric characters
Changes to this setting do not affect existing passwords. A password change should therefore be required for all existing accounts when password complexity rules are changed. Note that it could be acceptable to reduce the complexity requirements with a compensating control of a longer minimum password length, such as if passphrases are preferred.
ENFORCE LOCAL ACCOUNT LOCKOUTS
Enforcing account lockouts protects the accounts against password guessing and brute force attacks. In combination with enforcing password complexity, this reduces the likelihood of an account being compromised using password guessing or brute force attacks.
Account lockout can be configured using the following steps in WebAdmin:
Go to Definitions & Users -> Authentication Services -> Advanced. Administrators can then choose the number of attempts before being locked out and specify the time an account is locked out for. The option “Drop packets from blocked hosts”, prevents hosts from accessing the specified services ( WebAdmin, SSH etc.) when an account lockout was triggered from such hosts. The default is to block access to hosts for 10 minutes after 3 failed attempts.
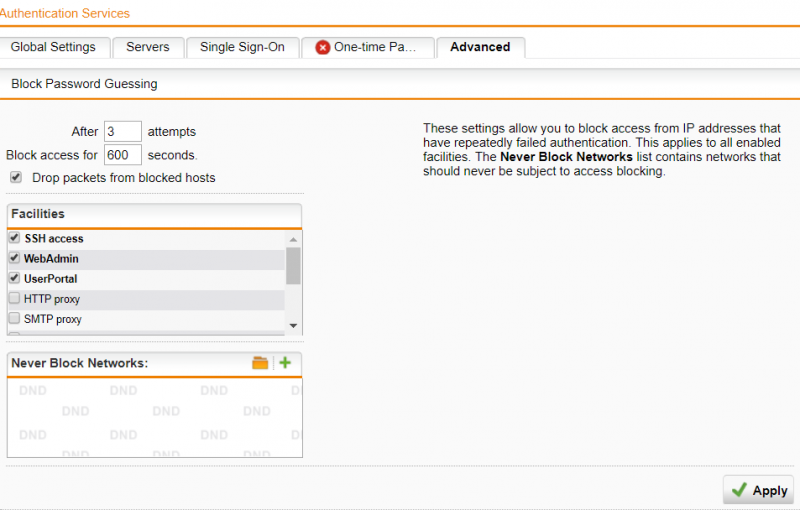
It’s fine to increase the lockout value from the default 3 attempts to a slightly higher value such as 5 attempts, as this will not significantly aid a brute force attack and may address nuisance lockouts experienced accidentally with a lower value.
ACCESS TO ADMINISTRATIVE PORTS
Telnet and HTTP are disabled by default and Sophos does not permit these protocols to be used for administrative access, therefore nothing needs to be changed to disable these services.
FIREWALL RULES
ADD COMMENTS TO RULES
Adding a clear description to every rule that shows ownership, date and purpose of the rule, or a ticket reference, is crucial for identifying whether a rule is still required or could potentially be removed. This facilitates housekeeping and general management of the firewall rules.
Adding comments to existing firewall rules can be achieved using the following steps in WebAdmin:
1) Go to Network Protection -> Firewall, then click the “Edit” button in the section for the rule that you wish to add a comment to.
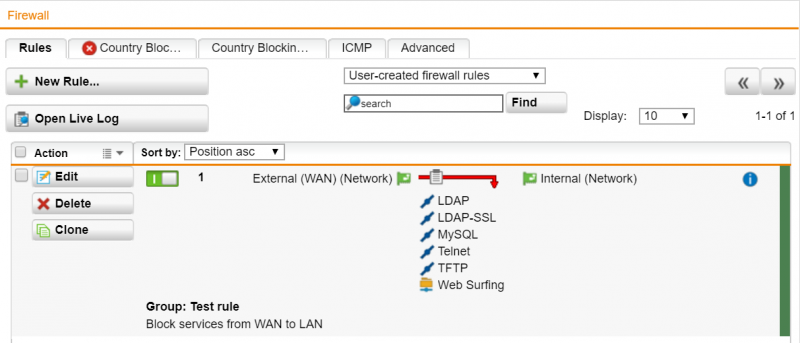
2) In the parameter “Comment”, add a description of the rule for example including the date, owner and ruler.
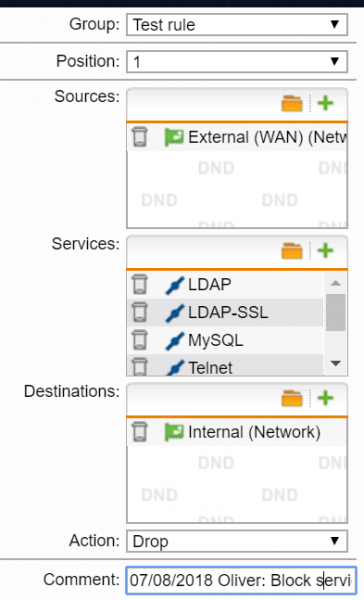
The comment could include a helpdesk ticket number relating to the change or a change control request reference number, depending on how the organisation operates.
REMOVE INACTIVE RULES
Inactive rules make it harder to manage the firewall rule groups effectively.
Removing inactive rules can be achieved using the following steps in WebAdmin::
1) Go to Network Protection -> Firewall and choose “status” from the drop-down “Sort by”
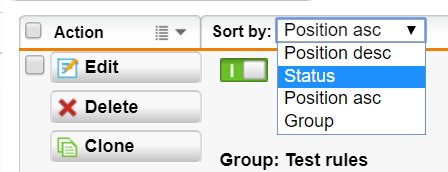
2) The option in the drop-down list “Sort by” is changed to “status asc” by default. This option sorts the rules to make the inactive rules to appear at the top of the list. Inactive rules are indicated by the switch showing grey with the symbol “O”, instead of green with the symbol “I”.
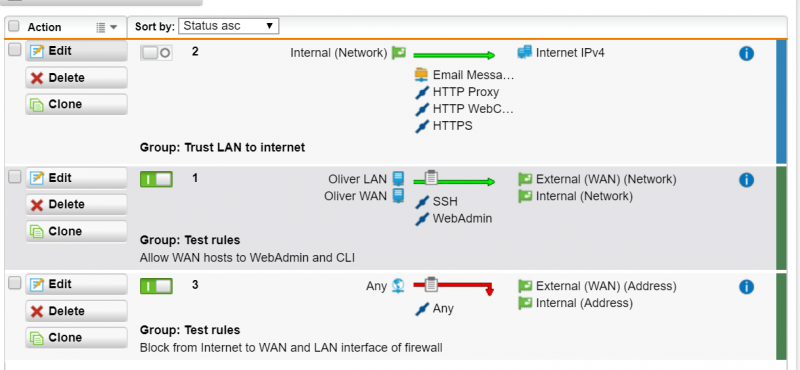
3) Delete the inactive rule by clicking “Delete” on the left of the rule.
APPLY AN EXPLICIT DEFAULT DENY RULE
A default deny rule ensures that traffic without specific rules to permit it, will get denied by default. Sophos UTM has a global default deny rule by default that drops all inbound traffic, although it does not show the rule in WebAdmin.
However, it is good practice to create an explicit deny all rule at the bottom of the list of rules for TCP connections to and from the WAN interface and also for the LAN interface.
This can be achieved in WebAdmin using the following steps:
1) Go to Network Protection -> Firewall
2) Add a new rule by clicking the “+ New Rule…” button. In the pop-up window, select the “Deny” in the drop-down list “Action”.
3) Ensure that the Source and Destination criteria are set to “Any“, and that the service is set to “Any“.
4) Open up the “Advanced” tab and check the box “Log traffic” to log the explicit deny rule.
RESTRICT OVERLY PERMISSIVE RULES
Overly permissive rules are a risk to the organisation, as they allow unintended traffic to get through the firewall. An organisation should tighten overly permissive rules to the required source address(es), destination address(es) and service(s) or destination port(s). In order to achieve this without impacting the organisation’s operations or accidentally causing a denial of service, organisations should monitor the rules to identify traffic matching them. Rules should be monitored for a sufficient period of time as determined by the organisation. Once the data has been collected and analysed, the organisation can tighten the firewall rule to match the identified traffic. Organisations should consider using a remote syslog server to collect the logs and limit monitoring to a small number of rules.
CONFIGURE A SYSLOG SERVER AND ENABLE LOGGING TO THIS SERVER
The following steps can be used to configure a syslog server using WebAdmin:
1) Go to Logging & Reporting -> Log Settings -> Remote Syslog Server. Click the grey switch to enable Remote syslog.
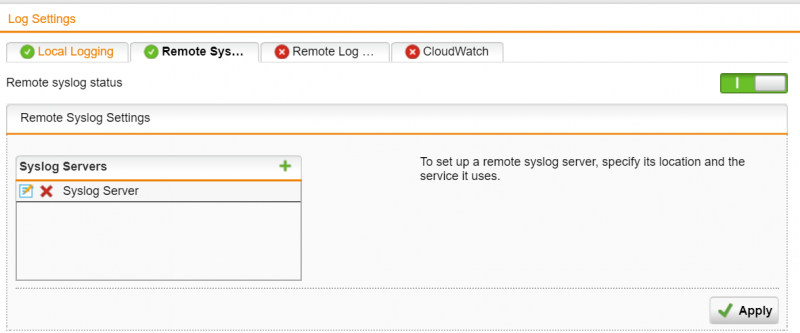
2) Click the plus button in “Syslog Servers” and specify the name of the server, the IP address or the network object of where the Syslog server is located and the port or service object.
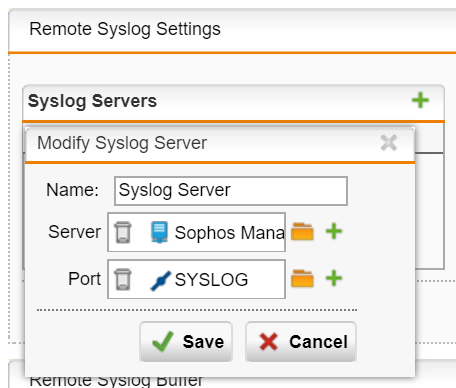
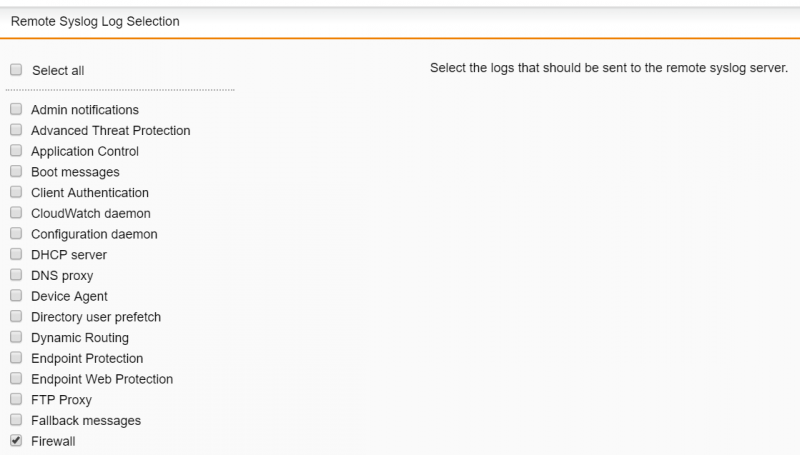
3) Click “Save” and then “Apply” to save the changes. After adding a server, go to “Remote Syslog Log Selection” and select the type of logs that should be sent to the remote syslog server e.g. Firewall
ENABLE LOGGING FOR SPECIFIC ACCESS RULES
The following steps can be used to enable monitoring on a specific rule using WebAdmin:
Network Protection -> Firewall. Click “Edit” on one of the rules and then “Advanced”. Tick the “Log traffic” checkbox, and set the time period in the drop down menu.
FIND LOGS FOR A SPECIFIC RULE
Logs are given a logmark value and an id value to help track which logs relate to which rule.
Logmark values are identified by the numbers beginning with 60***, and they are used to identify the purpose of the rule itself, for example logmark value 60004 is used to identify forbidden SSH connections and 60005 is used to log forbidden WebAdmin connections. This will help narrow down the search in the log file for the specific rule.
Each rule has a unique id value with numbers beginning with 200* and they can be used on the a remote sSyslog server to search for logs related to a specific rule. A further list of logmark values can be found here: https://community.sophos.com/kb/en-us/115029
MODIFY AN EXISTING RULE
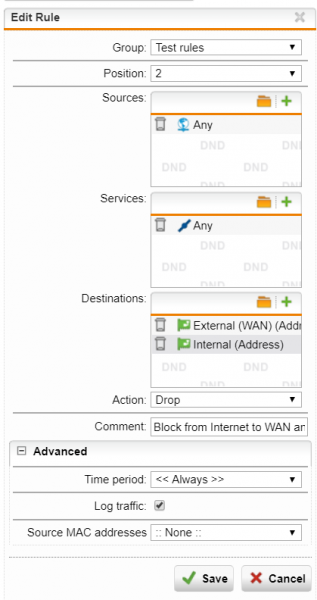
The following steps can be used to modify a rule using WebAdmin:
Go to Network Protection -> Firewall. Click “Edit” to modify the rule. Refine the parameters such as “Destinations” and “Services“, and click “Save” to confirm.
FIREWALL RULES GOOD PRACTICES
RESTRICT INTERNET ACCESS TO THE WEB PROXY
Allowing internal users to freely access the Internet could result in them accidently visiting phishing websites or malicious websites hosting malware which could lead to the compromise of the internal network.
In addition to enforcing the use of a Web Proxy through Group Policy, it is recommended to also enforce this on the boundary firewall to ensure that it cannot be bypassed. This can be achieved by only allowing the proxy’s address to access external websites using HTTP or HTTPS protocol and preventing all other internal hosts from sending traffic to external destinations using HTTP or HTTPS protocol.
RESTRICT ACCESS TO HIGH RISK PORTS FROM EXTERNAL UNTRUSTED SOURCES
Services can be considered high risk for a number of reasons. They are used by clear-text protocols, allow privileged access, or are commonly targeted by attackers because of the popularity or vulnerabilities of the underlying software. Wherever possible and practical It is recommended to restrict access to such ports/services to trusted sources in order to reduce the potential attack surface exposed by the organisation.
An example of ports that can be considered high risk is shown below:
- HTTP (TCP 80, 8080)
- RDP (TCP 3389)
- Telnet (TCP 23)
- FTP (TCP 21)
- TFTP (UDP 69)
- VNC (5900-590x)
- SMB (TCP 445, 1137, 139, UDP 137, 138)
- Kerberos (TCP 88, UDP 88)
- SSH (TCP 22)
- LDAP (TCP/UDP 389)
Please note that this is not an exhaustive list.
RESTRICT OUTBOUND TRAFFIC FROM THE INTERNAL NETWORK OR DMZ
Overly permissive rules from the internal network to external sources could allow data to be exfiltrated from the internal network, as well as allow compromised hosts to communicate with command and control servers. Outbound traffic from the internal network and DMZ should be restricted to the resources and services required by users to carry out their job.


