

Much as they may wish to do otherwise, organisations may need to install the Java Runtime Environment (JRE) so users have the Java Plugin they need for required web-sites, and/or run installed Java applications provided as JAR files. However, the vulnerabilities of JRE are well known and documented, as shown below, so meeting this requirement is not without risk. The purpose of this blog is to look at how the risk of enabling Java Plugins and the running of Java files can be minimised.
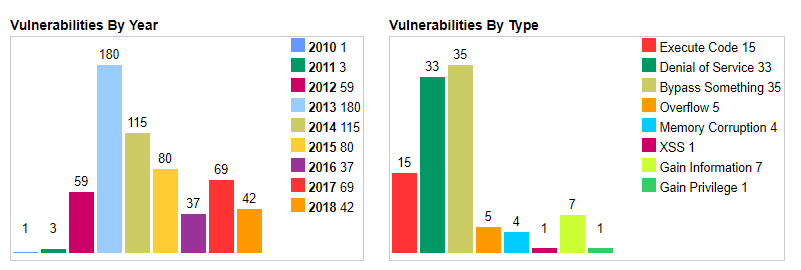
Vulnerabilities of the Java Runtime Environment by year and by type between 2010 and 2018 [1].
Background
In the early days, browsers did not have much functionality and Java applets were a way of providing a richer, interactive environment for web users. Applets are small pieces of compiled bytecode that a browser can download and run and they can be simple (providing a rollover button or drop-down menu) or complex (visualising protein structures and sequences). Applets are usually embedded in a web page and run in the context of the browser, either in the frame of the webpage or a new application window. Java Plugins link the browser and the Java Runtime Environment (JRE) within which sits a Java Virtual Machine (JVM) that executes the bytecode, as shown below:
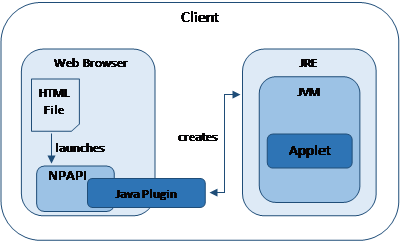
Interoperation of the Java Plugin and the JVM [2].
Over time, the capability of browsers has advanced and developers wanted cross-platform capability, which meant dropping standards-based Plugin support (NPAPI). Additionally, as previously noted, JRE has been a major contributor to security problems with regard to the running of sandboxed applets. Browser support has therefore declined to the point where, at the time of writing, only Internet Explorer and Safari have support for Java Plugins, and even in Safari it is limited to the desktop; Chrome, Firefox, Opera and Edge do not have any support and even Oracle deprecated support for the Java Plugin in Java 9.
The Sandbox model
Java applications adhere to the principle ‘Write Once Read Anywhere’. This is accomplished by using a JVM as a run-time engine. The JVM allows developers to write code without having to worry about the hardware on which it may be run. The JVM has full access to resources on the local machine and mediates requests for such from the code. However, what if the code cannot be trusted to have that much access? This is where the sandbox comes in. The sandbox has three elements, (i) the Byte Code Verifier, which verifies that code is safe before it is allowed to run, (ii) the applet class loader which defines when and how an applet can add classes to the run-time environment and (iii) the security manager which defines the access given to a class, and also generates the dreaded ‘Security Exception’ error when a class attempts to do something it is not allowed to do. Together these three elements create a restricted environment with limited resources. At first, local code was trusted and ran directly in the JVM whereas remote code, such as a website applet, always ran in the sandbox. This was followed by allowing applets that were signed with a signature from a recognised certificate authority to run directly in the JVM. However, this model was rather inflexible so the implementation of more granular control, if required, was simplified. In this approach, all code is treated as untrusted and subject to examination. At runtime, an Access Controller compares a requested action with a list of granted permissions in a policy object to see if that action will be allowed or denied. The policy object for a given user is built, on the fly, from the contents of a system security policy file and any user security policy files. The policy object is not used by default, however; its use must be specified at runtime otherwise the code will be treated either as trusted or untrusted as before. By definition, the use of a policy object disables the Java Plugin’s default security prompting behaviour.
Code Signing, Certificates and Certificate Authorities
Beginning with Java 7 update 10 it has been possible to disable the use of Java in the browser. This release also introduced the ability to define security with respect to unsigned applets; they will run but the user gets a security prompt. From Java 7 update 21, unsigned applets will, by default, not run at all, and support for the Java Plugin is deprecated entirely from Java 9. So what is a signed applet?
A signed applet is one whose code has been signed using private key associated with the public key in a certificate issued by a trusted Certificate Authority. Let us look at each of these in turn.
Public and Private Keys
Public and private keys are used in Public-key, or asymmetric, cryptography which is most publicly used in providing secure connections to websites.
How are they used for code signing, however? If I sign a legal document, the purpose of my signature is to confirm that I am happy with the contents. Indeed, I may sign on every page of the document, to enable confirmation that this is the original and it has not been tampered with. Prior to signing, my identify will have been verified, and my signature will be witnessed by a trusted third party, who also signs the document. Because of the nature of public-private keys, they can be used to implement a digital version of this process, for example to sign a Java applet. The stages are:
- I obtain a digital certificate. The certificate includes information about me, the purpose of the certificate, the signature of the Certificate Authority that issued the certificate, and my public key, created at the time of application for the certificate and partner to my private key, which I have securely saved somewhere;
- The data (applet code in this case) is created;
- A package is created consisting of the original data (applet code), the signed hash and a copy of my certificate containing my public key. This package is my signed applet, which I incorporate in the html of a web page.
When a user connects to my web page, the browser passes my applet to the JVM, which does two things:
- Views the certificate and confirms its authenticity;
- Generates a hash of the applet code and then uses the public key in the certificate to decrypt the signed hash sent with the applet; the two hashes will match if the code is authentic. In other words, the code has not been tampered with and it must have come from me as it must have been signed using my private key that is the partner to the public key in the certificate.
If and only if the JVM can confirm that the certificate has been issued by a Certificate Authority that it trusts and the authenticity of all the code is assured will it treat the applet as trusted.
Certificates
A digital certificate is an electronic document that can be used to prove ownership of a public key. Digital certificates are issued by a Certificate Authority (CA). As well as information about the owner, what the certificate is for and the public key of the owner it includes the signature of the CA that issued the certificate.
Certificate Authorities
The glue that holds the whole process together is the CA. Certificate Authorities issue and manage digital certificates. They themselves possess certificates that they use to sign the certificates that they issue. CAs are hierarchical – a root CA can issue certificates for other CAs to issue certificates on their behalf, creating a certificate chain or path. There are a number of globally recognised CAs. Knowledge of their certificates is incorporated into the JVM, so the JVM can confirm their validity (remember the CA signature on the certificate). CAs also publish lists of revoked certificates, which applications can be configured to check on a regular basis. There are a number of reasons for revoking a certificate before its natural expiry date, but common ones are loss or theft of the private key, change in subject domain name or the subject being no longer in service.
A word of warning
It is important to understand what code signing can and cannot deliver.
Code signing can prove that code has not been tampered with.
Code signing should be able to prove the authenticity of the publisher.
Code signing cannot prove that the code is safe or free from bugs.
The second point is an interesting one. Remember that the CA takes the role of a Trusted Third Party in this process. What if the behaviour of a CA means that that trust is not warranted? What if they are issuing certificates without making the appropriate verification checks, for example? For these reasons, it is always wise to be aware of any problems regarding CAs and certificates that you may be relying on for assurance in code signing or other applications.
Java applets and code signing
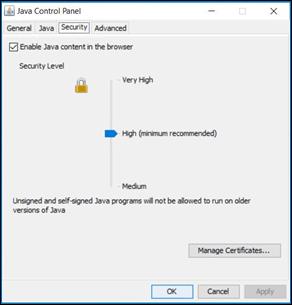
Prior to Java 7u10, all applets, signed or unsigned, were allowed to run. Since Java 7 update 10 the Java Control Panel controls how Java applets and Web Start applications are launched or run via a Security tab. The Java Control Panel can be accessed via ‘Java’ in the Control Panel or ‘Configure Java’ in the Start Menu. The figure below shows the Security tab in the Control Panel for Java 8 update 181:
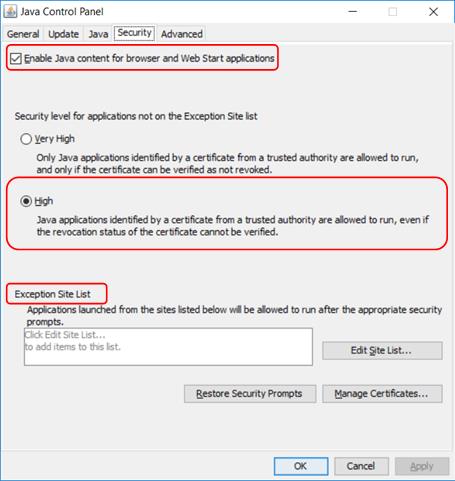
The first thing to note is that Java content is enabled for browser applications (applets) by default.
The second thing to note is that the default security level is ‘High’, which allows applets signed by a certificate from a trusted CA to run, even if the revocation status of the certificate cannot be verified. Clearly, the most secure level is ‘Very High’, but this would cause problems if the CA were, for any reason, not contactable.
The last thing to note is that neither Very High nor High level allow unsigned applets to run; if users must have access to a website that uses unsigned applets the ‘Exception Site List’ is where you can create a whitelist of the site(s). (Before Java 8 u20, you can also select the ‘Medium’ security level to allow the running of unsigned applets.)
Minimising the risk of using the Java Plugin
Running Java carries risk, so the aim here is to minimise that risk as much as possible. In this section the focus will be in minimising the risk of enabling the Java Plugin.
There are several ways in which this can be achieved, three of which are given below:
- Method 1 – Use Internet Explorer as the sole browser and use whitelisting to restrict the sites on which the Java Plugin will run;
- Method 2 – Configure Internet Explorer to only have access to a specified list of sites that require the Java Plugin. Use a second browser that does not support the Java Plugin to access all other sites;
- Method 3 – Use a single browser that does not support Java Plugins but which has legacy browser support to launch Internet Explorer for whitelisted sites that do require Java.
Implementation using each of the methods is discussed below for workstations running a Windows operating system.
Method 1: Using Internet Explorer as the sole browser
The configuration steps are:
- Restrict Internet Explorer so that Java is disabled for Internet zone sites and set to High for sites in the Trusted Sites zone;
- Add sites that require Java to which users are allowed access to the Trusted Sites zone;
- Test usage of each of the allowed Java sites in turn with the default Java security; configuration. Respond to security prompts as required. Make the resulting trusted.certs file available to all users;
- If any required websites are using unsigned applets, add these sites to the Exception Site List and make the resulting exceptions.list file available to all users.
Step 1 – Disable Java for the Internet Zone and set High Safety for the Trusted Sites Zone
This setting can be configured under either the Computer Configuration or the User Configuration group policy nodes. From an efficiency and a security perspective it is recommended to configure it under the Computer Configuration node.
In Group Policy Management Editor got to Computer Configuration → Policies → Administrative Templates → Windows Components → Internet Explorer → Internet Control Panel → Security Page → Internet Zone.
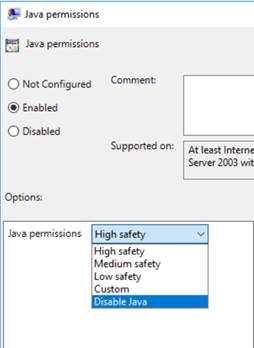
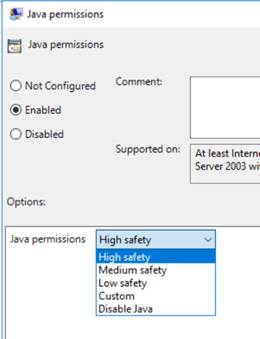
Enable the Java permissions setting and set it to ‘Disable Java’, as shown below:
In Group Policy Management Editor got to Computer Configuration → Policies → Administrative Templates → Windows Components → Internet Explorer → Internet Control Panel → Security Page → Trusted Sites Zone.
Enable the Java permissions setting and set it to ‘High safety’, as shown below:
Step 2 – Add allowed (whitelisted) sites to the Trusted Sites zone
As previously, while this setting can be configured under either the Computer Configuration or the User Configuration group policy nodes it is recommended to configure it under the Computer Configuration node. It is also worth noting that enabling this setting prevents users from personally editing the list of sites in the Trusted Sites zone.
In Group Policy Management Editor got to Computer Configuration → Policies → Administrative Templates → Windows Components → Internet Explorer → Internet Control Panel → Security Page
Enable the Site to Zone Assignment List, and add the allowed sites; a value of 2 corresponds to the Trusted Sites zone, as shown below:

Important Note:
Java can be invoked either by using the APPLET, OBJECT or EMBED HTML tags. Because support for the OBJECT and EMBED tags was inconsistent between browsers, Oracle recommended that in a mixed-browser environment, such as the Internet, the APPLET tag should be used [3]. Internet Explorer will, however, load Java via an OBJECT tag if it is encountered.
This is important to understand because the steps taken so far will not prevent loading of Java from an Internet Zone site in such a situation; it must be restricted at the Java Plugin itself.
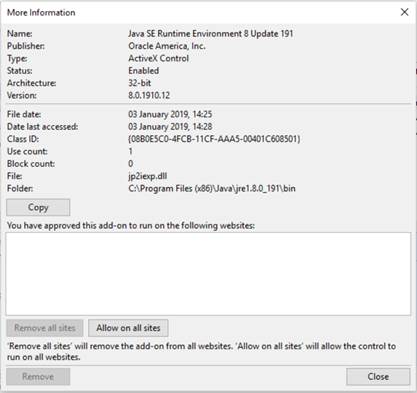
In Internet Explorer, go to Settings → Manage Add-ons, highlight the Java Plugin and then click on ‘More Information’. This will give information about the Add-on, including the sites on which it has been allowed to run. Remove all sites or wildcards from the list to prevent the Java Plugin from loading as an OBJECT on Internet Zone sites, as shown below:
Steps 3 and 4 are common to all methods and so are dealt with separately at the end.
Method 2: Using Internet Explorer and a second browser independently
You may prefer that users only use Internet Explorer for sites that require Java Plugin support, and another browser for all other internet access.
In this method the two browsers are used completely independently so, to avoid frustration, users must be clear on what each browser may (or may not) be used for.
The method assumes that users have two browsers available – one that does not support Java Plugins (eg Chrome or Firefox) that they can use for general browsing, plus Internet Explorer for accessing websites that do need Java Plugin support. Note that Edge cannot be used as the second browser because its proxy settings cannot be set separately from those of Internet Explorer.
The configuration steps are:
- Restrict Internet Explorer so that it can connect only to the websites that contain web-pages with Java applets that users must access;
- Ensure that the ‘non Java’ browser does not have the same restrictions so it can be used for allowed general browsing;
- Test usage of each of the allowed Java sites in turn with the default Java security configuration. Respond to security prompts as required. Make the resulting trusted.certs file available to all users;
- If any required websites are using unsigned applets, add these sites to the Exception Site List and make the resulting exceptions.list file available to all users.
Step 1 – Restricting Internet Explorer to a specified list of sites
There is more than one way of creating a whitelist of web sites for Internet Explorer, but in a business environment, a good solution can be to use Internet Explorer’s proxy settings, either through configuration of Proxy server settings or by using a PAC file. Both of these solutions:
- Direct all traffic except that for allowed sites to a non-existent proxy address;
- Require bookmark entries to enable users to access allowed sites without the need of a search engine;
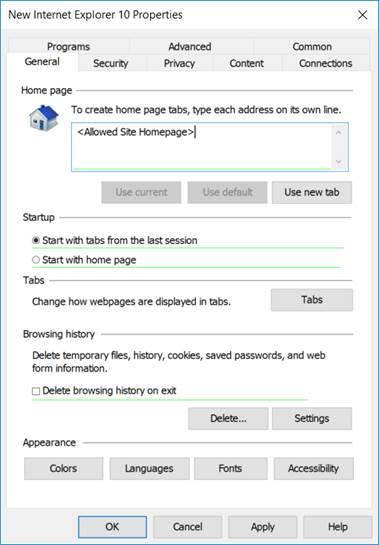
- Require the Home page to be set to an allowed site;
- Require Chrome’s proxy settings (if Chrome is being used as the ‘non Java’ browser) to be independently set, since by default Chrome inherits its proxy settings from Internet Explorer.
Direct configuration
Bookmarks and Home Page
Before configuring proxy settings, create bookmarks for each site that will be allowed and set the Home Page to one of these sites.
Configuring Proxy server settings
This solution is only applicable if allowed traffic can go direct out to the internet, or is directed to a proxy by means other than client proxy settings.
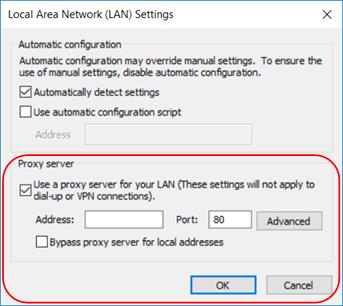
It is done by configuring the Proxy Settings, accessible via Internet Options → Connections → LAN settings. Under ‘Proxy server’ select ‘Use a proxy server for your LAN’, as shown below.
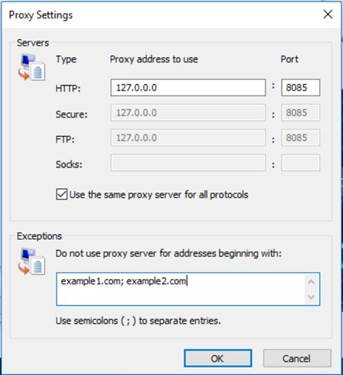
Click on <Advanced> and then configure ‘Servers’ settings and add the allowed websites to the ‘Exceptions’ list, as shown below:
Using a PAC file
This solution works if allowed traffic must go to a proxy address and this is specified on the client. Note that the PAC file must be available via an URL; local storage is no longer permitted.
The content of a simple proxy PAC file is shown below. For further information on PAC file options, it may be helpful to go to, for example, https://findproxyforurl.com/.
function FindProxyForURL(url, host) {
//
//If the domain name matches send to regular proxy (DIRECT for example)
      if (dnsDomainIs(host, "example1.com")||
      dnsDomainIs(host, "example2.com"))
      return "PROXY <proxy ip> <proxy port>";
//
//DEFAULT RULE: All other traffic send to black hole
      return "PROXY 127.0.0.1:8080";
}
Deployment using Group Policy
Bookmark entries, Home page and proxy settings can all be deployed using Group Policy. Start by creating a new policy linked to the relevant container in Active Directory and then configuring settings as follows:
Proxy and Home Page settings
In Group Policy Management Editor got to User Configuration à Preferences → Control Panel Settings → Internet Settings
Create a new policy for the relevant version of Internet Explorer (choose 10 for Internet Explorer 11) as follows:
To set a Home Page, click in the ‘Home page’ box on the General tab, and use F5 to enable a setting that will be applied using Group Policy Preferences; the red dotted line in the box will become a green solid line. Enter the required Home Page URL from the list of allowed sites, as shown below.
To set a proxy PAC file location go to LAN settings, click in the ‘Address:’ box, use F5 as before to enable a setting that will be applied, then specify the URL of the PAC file.
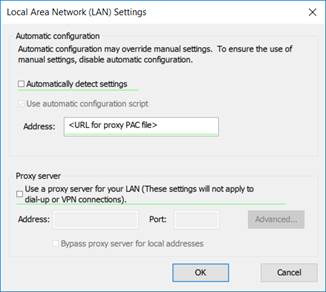
To configure the browser where a PAC file is not in use, select to ‘Use a proxy server for your LAN’ then click in the ‘Address:’ box and use F5 as before to enable settings that will be applied. Add settings as described previously for manual configuration
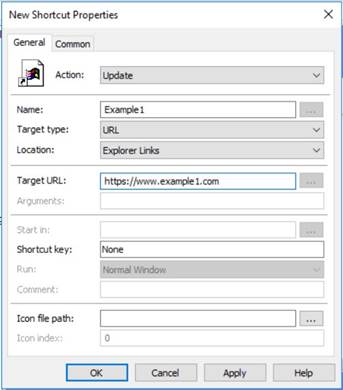
Bookmark entries
In Group Policy Management Editor got to User Configuration → Preferences → Windows Settings → Shortcuts. For each bookmark entry, right-click to create a new Shortcut with the following settings, as shown below:
Step 2 – Ensuring that the ‘non Java’ browser is not restricted
Direct configuration of Chrome
By default, Chrome inherits its proxy settings from Internet Explorer. If Chrome is to be used for other browsing activities this default behaviour can be changed by modifying the path in the shortcut to Chrome as follows:
To use a different proxy server append a proxy-server instruction to the path, as in the example below:
"C:\Program Files (x86)\Google\Chrome\Application\chrome.exe" --proxy-server="1.2.3.4:8080"
To disable proxy settings append a ‘no-proxy-server’ instruction to the path, as in the example below:
"C:\Program Files (x86)\Google\Chrome\Application\chrome.exe" --no-proxy-server
Checking the Proxy setting for Firefox
By default, Firefox does not inherit proxy settings from Internet Explorer. To confirm this, in Firefox go to Options → General → Network Proxy → Settings, and check that ‘Use system proxy settings’ is not selected.
Configuration of Chrome using Group Policy
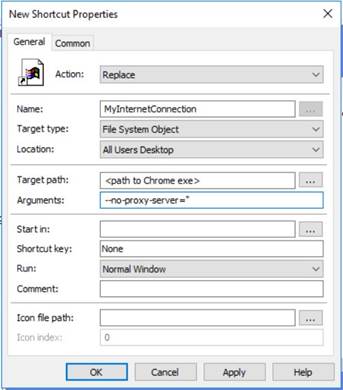
Chrome can be configured with its own proxy setting by using Group Policy, as follows:
In Group Policy Management Editor got to User Configuration → Preferences → Windows Settings → Shortcuts. Right-click to create a new Shortcut as shown below where, in this case, the ‘no proxy server’ option is to be included in the shortcut target path, as shown below:
Steps 3 and 4 are common to all methods and so are dealt with separately at the end.
Method 3: Using a single browser with legacy support for Internet Explorer
In this final method two browsers are still used in practice but users only directly use the non-Java browser; Internet Explorer is automatically invoked by the non-Java browser only when required.
Both Chrome and Edge support this approach, through the Legacy Browser Support extension and Enterprise Mode, respectively. It may only be configured via Group Policy, however, so is only suitable for enterprise environments.
For information on using the Legacy Browser Support extension in Chrome please see the following URL:
https://support.google.com/chrome/a/answer/3019558?hl=en&ref_topic=3062034
For information on using Enterprise Mode in Edge please see the following URL:
https://docs.microsoft.com/en-us/internet-explorer/ie11-deploy-guide/what-is-enterprise-mode
All Methods: Step 3 – Creating a pre-populated trusted.certs file
Even signed applets may cause security prompts to pop-up. As it is bad practice to encourage users to click on ‘OK’ or ‘Run’ for such prompts this can be avoided by sharing a ‘pre-populated’ trusted.certs file, using the process described below.
- Create a Test user account (this creates a clean environment);
- Logon using this account and, in Internet Explorer, browse to all pages that a user would need access to, approving any security prompts on the way. This modifies the trusted.certs file that, by default, is in <userdir>/AppData/LocalLow/Sun/Java/Deployment/security;
- Deploy the trusted.certs file to all users by using a system level configuration file, deployment.config. This needs to be located in C:\Windows\Sun\Java\Deployment\ on each user’s machine (you may need to create this folder structure). This file points to a deployment.properties file, which may be local or may be on a network share.
Example content of deployment.config file pointing to a deployment.properties file in the same location is shown below:
#Path to deployment properties file
deployment.system.config=file\:\\C\:\\Windows\\Sun\\Java\\Deployment\\deployment.properties
deployment.system.config.mandatory=true
Example content of deployment.properties file, pointing to the pre-populated trusted.certs file in the same location is shown below:
#Path to trusted.certs file
deployment.system.security.trusted.certs=C\:\\Windows\\Sun\\Java\\Deployment\\trusted.certs
Important note: If you update the installed version of JRE then the trusted.certs file will need to be re-created and re-deployed.
All Methods: Step 4 – Enabling unsigned Java applets to run.
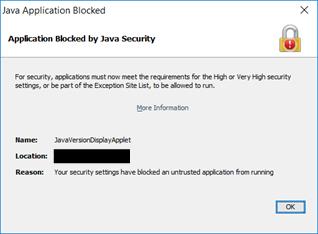
Websites should be using signed Java applets; signing was introduced to improve security so downgrading to allowing unsigned applets increases risk. Giving access to sites using unsigned Java applets is a last resort and should only be considered if using the webpage with the applet is essential and the developer is unable to provide a signed version. If an applet is not signed then, with default Java security in Java 7 u21 and later, you will get a pop-up notifying you that the application has been blocked by Java Security. An example pop-up from Java 8 u181 is shown below:
For Java 7 prior to update 51, unsigned applets can be run by lowering the Security Level in the Java Control Panel to Medium, as shown. However, there is no granularity; a user can run unsigned applets on all sites to which the browser has access.
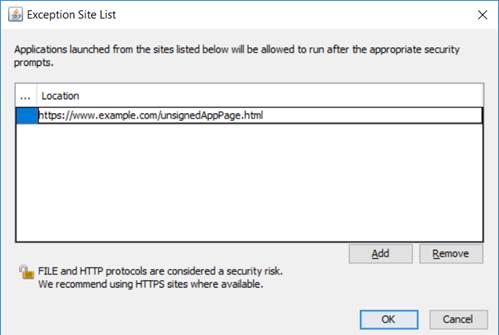
From Java 7 update 51 onwards the Exception Site List can be used to give more fine-grained control; untrusted applets will only run on sites explicitly added to the Exception Site List, as shown below. URLs that are added to this list should be as tightly specified as possible to limit the risk.
It is important to note that if the applet is hosted on a different URL from the web page then both URLs must be whitelisted enable the applet to run.
Adding sites to the Exception Site List populates the exception.sites file, located in the same folder as the trusted.certs file. As with the trusted.certs file, once an exception.sites file has been populated with entries from the Java Control Panel it can be made available to all users via the deployment.properties file, as in the example entry shown below:/br />
#Path to exception.sites file
deployment.user.security.exception.sites=C\:\\Windows\\Sun\\Java\\Deployment\\exception.sites
Minimising the risk of having JRE installed
Installation of JRE on a user’s computer means that they are able to run executable .jar files. As well as any legitimate .jar files this includes any files that they have been able to download, either directly from websites or received as email attachments, or have saved on removable media.
Preventing the running of these can be achieved via either Software Restriction Policies (SRP) or AppLocker. Depending on the version of the client operating system, both of these can be deployed using Group Policy. Information about on which versions of the Windows operating system will accept deployment of AppLocker policies via Group Policy can be found at https://docs.microsoft.com/en-us/windows/security/threat-protection/windows-defender-application-control/applocker/requirements-to-use-applocker.
Of all the differences between SRP and AppLocker, the one that is most relevant here is that SRP can accept custom extensions, while AppLocker cannot. This means that SRP has the more granular option of blocking or allowing the running of specific .jar files as well as the more fundamental approach of targeting Java executables whereas AppLocker can only be used at the executable level.
Using Software Restriction Policies to block the running of unknown .jar files
In Group Policy Management Editor go to Computer Configuration → Policies → Windows Settings → Software Restriction Policies. If no policies are in place right-click to create ‘New Software Restriction Policies’.
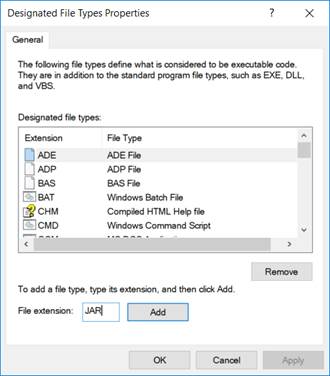
In the policy settings, open up ‘Designated File Types’ and add the JAR file extension to the list, as shown below.
In the policy settings, under ‘Additional Rules’, right-click to create a ‘New Path Rule’ and configure it with a path of *.jar, as shown below:
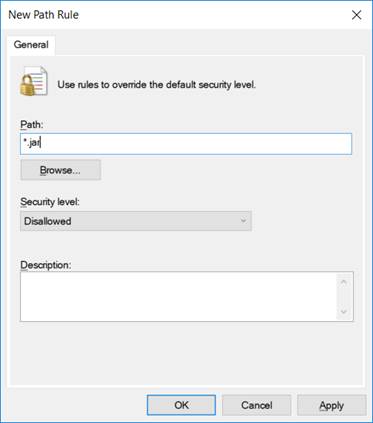
This will block the running of all .jar files. To allow known .jar files to run just add an ‘Unrestricted’ rule for each file.
Important Note: Users are only blocked from running .jar files through Explorer; they will still be able to run .jar files from the ‘Run’ dialogue box or the command prompt, so access to both of these functions also needs to be restricted.
Once the policy has been applied, confirm which paths are disallowed or unrestricted by viewing the following registry key:
Computer\HKEY_LOCAL_MACHINE\SOFTWARE\Policies\Microsoft\Windows\safer\codeidentifiers\
Paths under the code identifier “0” are Disallowed, whereas paths under the code identifier “262144” are Unrestricted.
Using AppLocker to block specific Java executables
As noted previously, custom extensions cannot be added to AppLocker so .jar files can only be prevented from running by blocking the Java executable. The relevant executables are:
- java.exe – called when a .jar file is run from the command line
- javaw.exe – called when a .jar file is run via Windows (eg File Explorer)
- jp2launcher.exe – called when a Java applet embedded in a web-page is run
If, for example, it must be possible to run Java Applets embedded in web-pages but .jar files must not be allowed to run then java.exe and javaw.exe must be blocked but jp2launcher.exe must be allowed. This can be done as follows:
In Group Policy Management Editor go to Computer Configuration → Policies → Windows Settings → Application Control Policies → AppLocker → Executable Rules.
javaw.exe
javaw.exe can be blocked by adding a Path exception to the default rule for ‘All files located in the Program Files folder’ as shown below for javaw.exe:
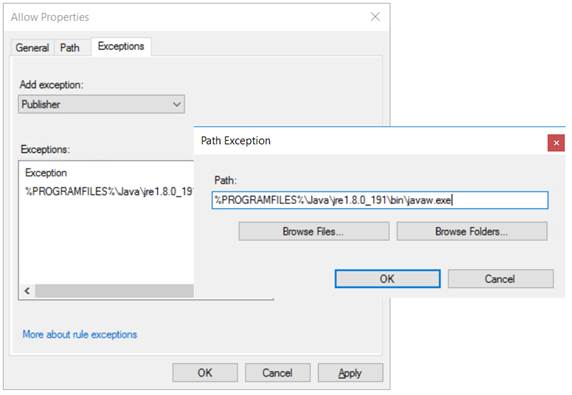
java.exe
The above approach does not work for java.exe. It only prevents users from running the executable when they have changed the command prompt directory to C:\Program Files (x86)\Java\jre1.8.0_191\bin. If users call java.exe from elsewhere, for example from the default directory of C:\Users\<username>, it will run.
This problem can be solved either by restricting access to the Run and Command Prompts or by adding the exception for java.exe as a hash, rather than a path. For consistency the same approach could also be used for javaw.exe.
Once the policy has been applied, confirm application by viewing the following registry key:
Computer\HKEY_LOCAL_MACHINE\SOFTWARE\Policies\Microsoft\Windows\SrpV2\Exe\
Each rule will have its own key. Within this, the Value entry shows what the rule allows (or denies) and any exceptions, in XML format.
Important notes:
- AppLocker is whitelist based and the Default Rules only allow executables to run if they are in the Program Files or the Windows folder. If users must run executables located in other folders then you will need to explicitly allow them, otherwise they will be blocked;
- The last rule in the Default Rule set allows members of the local Administrators group to run all applications. AppLocker is based on a whitelist approach and rules do not have an order of application, so this rule will cause any ‘Deny’ rules to be ignored for members of local Administrators group. This potential vulnerability is mitigated against by following the best practice approach of all users logging on with standard, non-privileged accounts, as their primary account and admin-level accounts only being used when required;
- If SRPs are run in the same domain as AppLocker policies, then they will be ignored on computers that can receive AppLocker policies.
Conclusion
In an ideal world, there would be no need to run Java. However, this is not always possible and so I hope that this blog has given you some insight into how to minimise the risk of installing JRE and enabling the Java Plugin by restricting the sites to which a Plugin-enabled browser has access, and the ability of a user to run Java files.
[1] https://www.cvedetails.com/product/19117/Oracle-JRE.html?vendor_id=93
[2] Based on https://blogs.oracle.com/stevenchan/java-web-start-now-available-for-ebs-121-and-122
[3] https://docs.oracle.com/javase/8/docs/technotes/guides/jweb/applet/using_tags.html


