

Dionach perform a number of firewall reviews and we often have to interact with different technologies and vendors. Alongside Cisco firewalls, Check Point firewalls are a popular solution used by organisations. This article provides guidance on how to harden Check Point firewalls and how to address the most common security issues.
Please note that the following recommendations were verified against a Check Point GAiA R80.10 appliance. As such, the menus might differ for other versions of the firewall.
ACCESS CONTROL
USE CENTRAL AUTHENTICATION
Configuring your Check Point firewall to use Central Authentication services ensures that an extra level of protection is in place for user access to the device. The use of a central authentication service allows organisations to easily and centrally manage user accounts. This simplifies account management processes, and ensures that users’ accounts can easily be disabled across all network devices once they leave the organisation.
Three common methods for authentication are TACACS+, RADIUS and LDAP.
TACACS+
You can configure the Check Point firewall to use TACACS+ using the web interface as follows:
Under “User Management > Authentication Servers”, check the “Enable TACACS+ configuration” and add a new server as shown below:
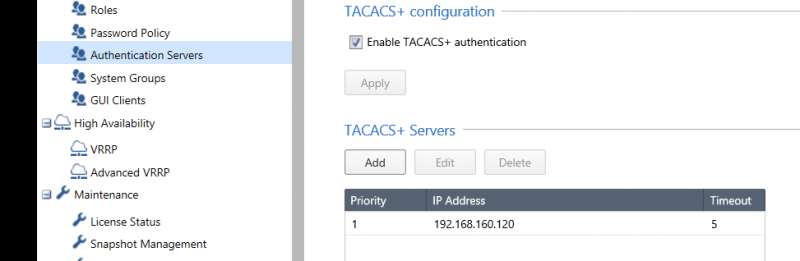
When adding a new server, it is possible to specify the priority, the address of the server, the shared key and the timeout:
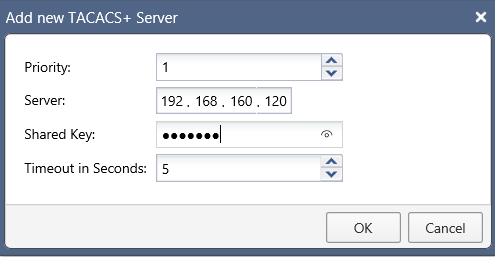
It is also possible to add a TACACS+ server by issuing the following command on the Check Point firewall command line interface:
add aaa tacacs-servers priority 1 server 192.168.160.120 key MyKey timeout 5
RADIUS
A RADIUS server can be configured in a similar way through the Web GUI, under “User Management > Authentication Servers” as shown:
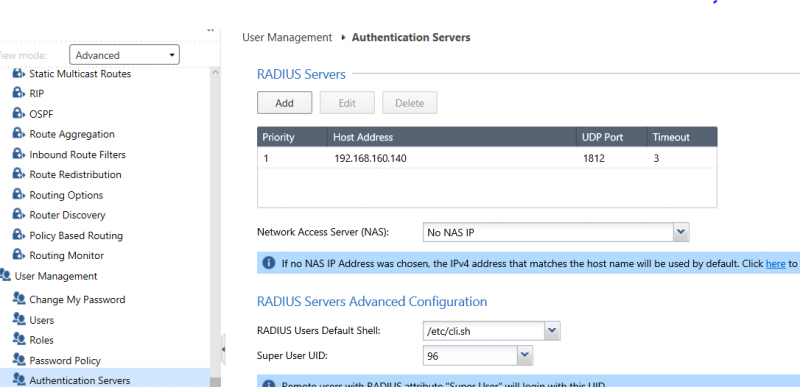
When adding a new server, it is possible to specify the priority, the host and port, the timeout and the shared secret:
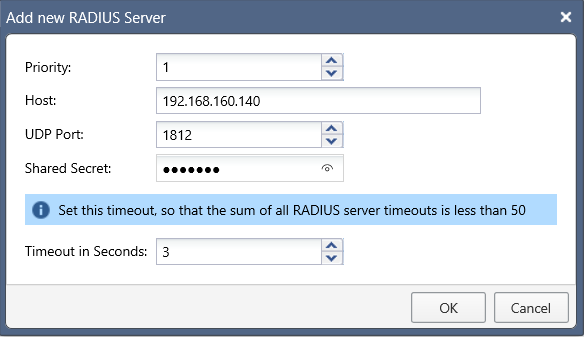
It is also possible to setup a RADIUS server by issuing the following command:
add aaa radius-servers priority 1 host 192.168.160.140 secret ******* port 1812 timeout 3
LDAP
To configure LDAP for Check Point firewalls, please refer to the following URL:
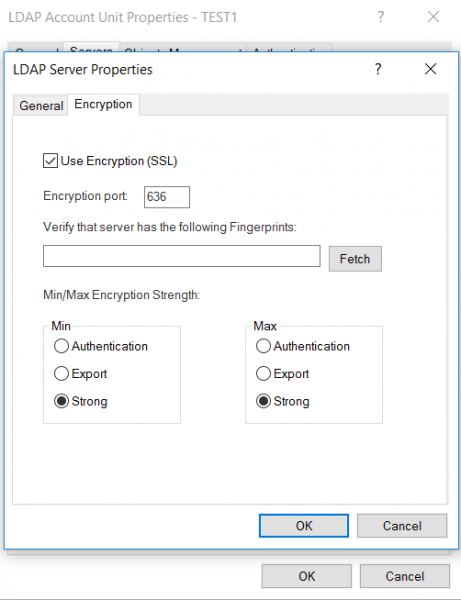
Please note that by default, plain text communication is used to communicate with the LDAP Server. If you do not configure SASL (e.g. Kerberos) to be used, it is recommended to secure the communications with SSL.
Enabling SSL for LDAP requests can be done through the SmartConsole, browsing the encryption tab when adding an LDAP server. Please note that by default, the minimum encryption strength is set to “Export“, however is it recommended to change this to “Strong” as shown below:
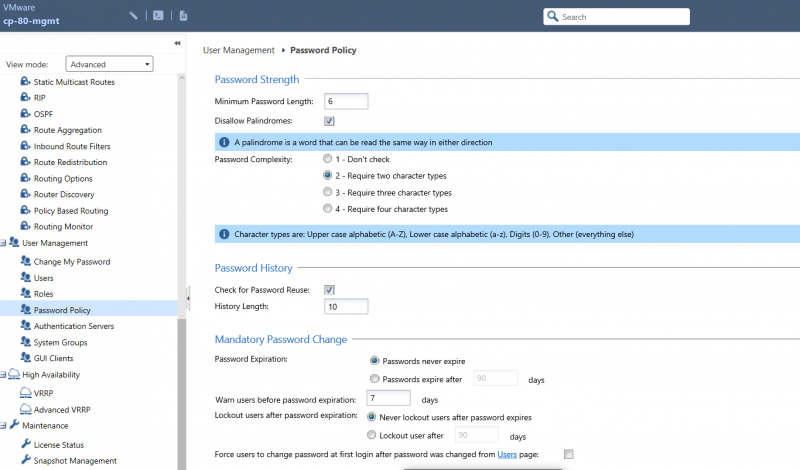
ENFORCE PASSWORD COMPLEXITY
By enforcing password complexity rules that comply with the organisation’s password policy, you can ensure that accounts are protected using complex passwords that are difficult to guess or brute force. Password complexity is often in place on Windows Active Directory, but overlooked on networking devices.
By default, the following password policy is enforced on Check Point firewalls:
- Minimum of 6 characters
- No palindromes
- Require two character types
- Character types are:
- Upper case alphabetic (A-Z)
- Lower case alphabetic (a-z)
- Digits (0-9)
- Other (everything else)
- Character types are:
- Password history of 10
A number of options can be configured from the “User Management > Password Policy” menu on the Web-GUI:
Alternatively, the CLI can be used to enforce complexity rules:
set password-controls
  min-password-length <6-128>
  palindrome-check <on |off>
  complexity <1-4>
Please note that a value of “1”for complexity effectively disables password complexity checks. Also, changes to this setting do not affect existing passwords. A password change should therefore be required for all existing accounts when password complexity rules are changed.
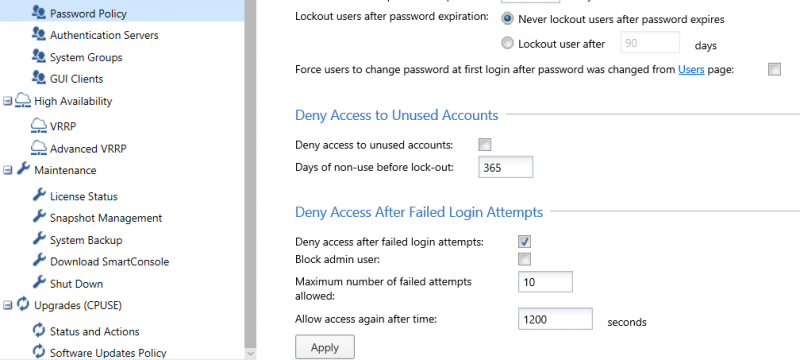
ENFORCE LOCAL ACCOUNT LOCKOUTS
Enforcing account lockouts protects the accounts against password guessing and brute force attacks. In combination with enforcing password complexity, this reduces the likelihood of an account being compromised using these techniques.
Account lockout can be enforced in the “User Management > Password Policy” menu on the Web-GUI as shown below. Please note that it is also possible to lock out users after their password has expired. This can be useful to protect and identify unused accounts.
Alternatively, the following CLI commands can be issued:
set password-controls
  deny-on-fail allow-after <60-604800>
  deny-on-fail failures-allowed <2-1000>
  deny-on-fail enable <off|on>
RESTRICT ACCESS TO ADMINISTRATIVE PORTS
Restricting access to administrative ports reduces the attack surface exposed by the device. Access to administrative ports should be restricted to trusted interfaces and/or IP addresses. By amending firewall rules it is possible to restrict access to the web console of both the gateway and the management systems. It is also possible to restrict access to the SmartConsole in the “User Management > GUI Clients” menu, as shown:
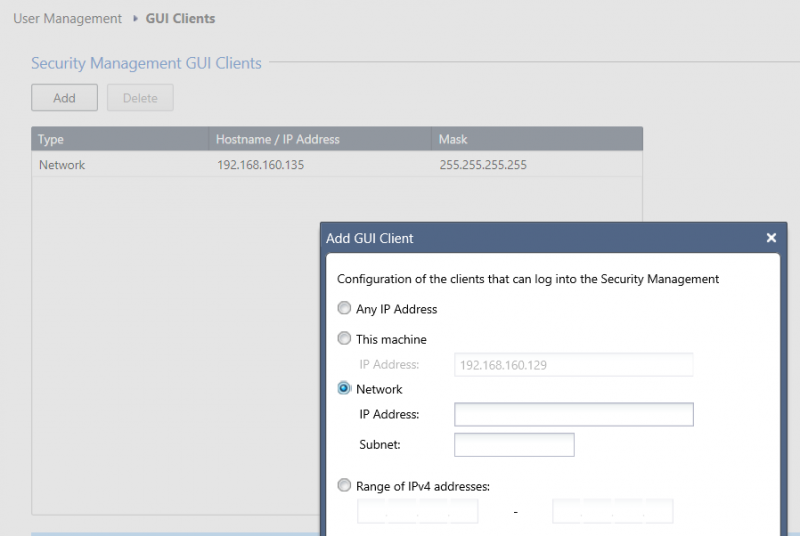
From the CLI, issue the “cpconfig” command and select the “GUI clients” option when prompted.
DISABLE PLAIN TEXT PROTOCOLS FOR ADMINISTRATIVE PORTS
Communication sent using plain text protocols could be sniffed by attackers. Check Point allows a secure, encrypted alternative to every plain text protocol, such as SSH instead of Telnet. Disabling plain text protocols is a quick win in terms of improving security.
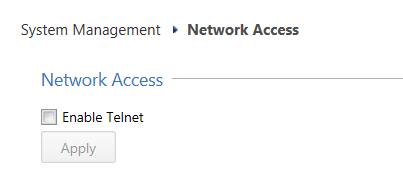
By default, Telnet access is disabled on a new installation of Check Point. It is possible to verify this by browsing to “System Management > Network Access“:
FIREWALL RULES
ADD COMMENTS TO RULES
Adding a clear description to every rule that shows ownership, date and purpose of the rule, or a ticket reference, is crucial for identifying whether a rule is still required or could potentially be removed. This facilitates housekeeping and general management of the firewall rules.
Adding comments to existing firewall rules can be achieved using the following steps on the SmartConsole.
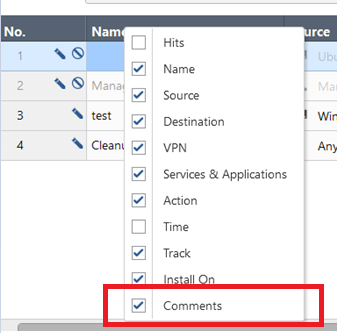
First, make the comments column visible by right clicking any column name and ticking the “Comments” checkbox:
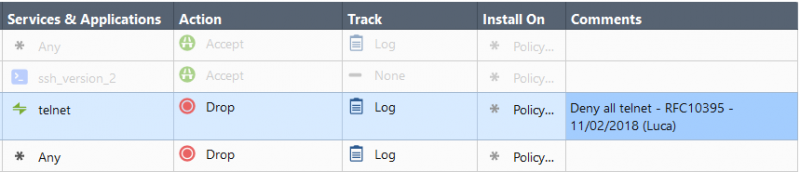
It is then possible to add comments by simply double clicking the comments cell of each rule:
REMOVE UNUSED FIREWALL RULES
Unused filter rule sets make it harder to manage the rule sets effectively, as potentially active rules are still present, but they are not tied to an interface, and therefore they do not have any effect.
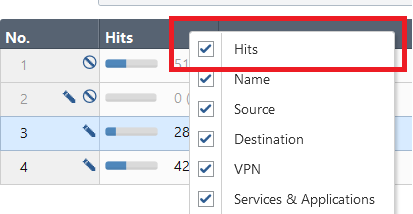
To determine unused firewall rules, you can use the built-in hits count. It is possible to display the hits for each rule by right clicking any column name and ticking the “Hits” checkbox:
It is then possible to generate a report by clicking “Actions > Export“. This will create a CSV file. From this file, it is then possible to filter zero-hits rules.
REMOVE INACTIVE RULES
Inactive rules make it harder to manage the firewall rule base effectively.
On Check Point firewalls, inactive rules are clearly displayed on the SmartConsole. Inactive rules are easy to identify by their transparent colour and a special symbol next to their number as shown:

It is also possible to filter rules with the “[Disabled]” field once a report is generated (“Actions > Export“).
APPLY AN EXPLICIT DEFAULT DENY RULE
A default deny rule – also referred to as clean-up rule – ensures that traffic without specific rules to permit it, will get denied by default. By adding an explicit clean-up rule it possible to track the number of times (hits) traffic was effectively denied. This is useful for monitoring the effectiveness of the deny rules, and identifying the nature of blocked traffic attempting to pass through the firewall.
If a clean-up rule does not exist, Check Point firewalls will display an alert on the SmartConsole. From there it will be possible to automatically add a clean-up rule as shown:

RESTRICT OVERLY PERMISSIVE RULES
Overly permissive rules are a risk to any organisation, as they allow unintended traffic through the firewall. Regular reviews should be scheduled to tighten overly permissive rules to the required source address(es), destination address(es) and service(s) or destination port(s). In order to achieve this without impacting the organisation’s operations or accidentally causing a denial of service, organisations should monitor the rules to identify traffic matching them. Rules should be monitored for a sufficient period of time as determined by the organisation. Once the data has been collected and analysed, the organisation can tighten the firewall rule to match the identified traffic. Check Point firewalls have a built-in logging system to collect and process the logs for each rule.
ENABLE LOGGING FOR SPECIFIC ACCESS RULES
The following steps can be used to enable monitoring on a specific rule using the SmartConsole:
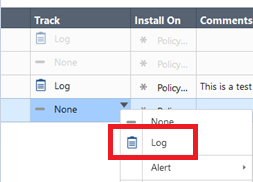
In the Security Policy menu, select “Log” in the “Track” column for the rules which need to be logged, as shown:
FIND LOGS FOR A SPECIFIC FILTER RULE
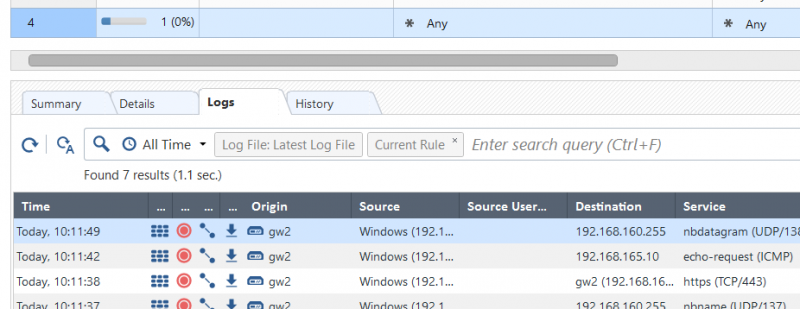
Rules are given a unique ID (UID) value to help track which logs relate to which rule. By default, when clicking on one rule, the logs for it will be displayed in the bottom part of the console, as shown below:
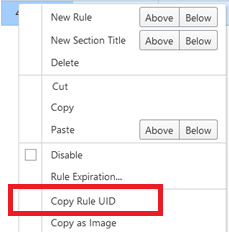
It is also possible to search the logs for entries related to a specific rule by using the rule UID. The identifier for a specific filter rule can be found in the following way using the SmartConsole:
Right click on the rule and select “Copy Rule UID“:
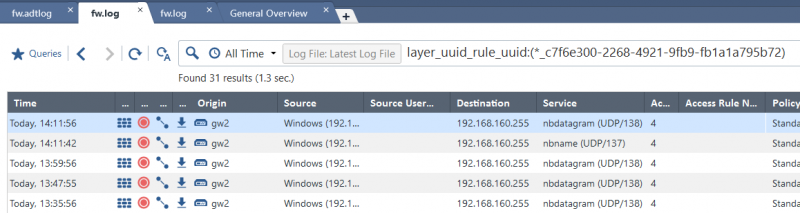
It is possible to use this to search for the rule logs in the “Logs & Monitor” tab, by issuing a query in the format of “layer_uuid_rule_uuid:*_(RULE-UID)” as shown in the following example:
FIREWALL RULES GOOD PRACTICES
RESTRICT INTERNET ACCESS TO THE WEB PROXY
Allowing internal users to freely access the Internet could result in them accidently visiting phishing websites or malicious websites hosting malware which could lead to the compromise of the internal network.
In addition to enforcing the use of a Web Proxy through Group Policy, it is recommended to also enforce this on the boundary firewall to ensure that it cannot be bypassed. This can be achieved by only allowing the proxy’s address to access external websites using HTTP or HTTPS protocol and preventing all other internal hosts from sending traffic to external destinations using the HTTP or HTTPS protocol.
RESTRICT ACCESS TO HIGH RISK PORTS FROM EXTERNAL UNTRUSTED SOURCES
Ports can be considered high risk for a number of reasons. They are used by clear-text protocols, allow privileged access, or are commonly targeted by attackers because of their popularity or vulnerabilities of the underlying service and their software. It is recommended to restrict access to such ports to trusted sources in order to reduce the potential attack surface exposed by the firewall.
An example of ports that can be considered high risk is shown below:
- HTTP (TCP 80, 8080)
- RDP (TCP 3389)
- Telnet (TCP 23)
- FTP (TCP 21)
- TFTP (UDP 69)
- VNC (5900-590x)
- SMB (TCP 445, 1137, 139, UDP 137, 138)
- Kerberos (TCP 88, UDP 88)
- SSH (TCP 22)
- LDAP (TCP/UDP 389)
Please note that this is not an exhaustive list.
RESTRICT OUTBOUND TRAFFIC FROM THE INTERNAL NETWORK OR DMZ
Overly permissive rules from the internal network to external sources could allow data to be exfiltrated from the internal network, as well as allow compromised hosts to communicate with command and control servers. Outbound traffic from the internal network and DMZ should be restricted to the resources and services required by users to carry out their job.
USE SECURITY ZONES EFFECTIVELY
It is possible to create Security Zones on Check Point to create an Access Control Policy and control the traffic between parts of the network. There are a number of predefined Security Zones, please refer to the following article for more information:

 2025/2026 CAF")
